

Macs Fan Control Tested: The Free Fan Control Tool That Has Stayed on My Mac for Over a Year
I have used Macs Fan Control on macOS for over a year. This article records how to download it, the key points to read in the GitHub README first, temperature sensor settings, fan curve logic, and the usage boundaries I personally pay attention to.
Introduction
I have used Macs Fan Control on my Mac for over a year. It is not the kind of tool I open every day and study for half an hour. It is more like something I install and let sit quietly in the background, then pull up when I feel the machine is getting hot, the fan policy feels too conservative, or I want to check CPU / GPU / SSD temperatures.
I use the free version, and on macOS its basic features are already enough. You can view temperature sensors, check the current fan speed, set a fan to a fixed RPM, or bind it to a sensor for automatic control. Those features are enough for me, so I have not had any particular need for the Pro version.
Before writing this article, I also read the official GitHub README. This is worth making clear first: the crystalidea/macs-fan-control GitHub repo is not a complete open-source code repository. It is mainly used for tracking bugs, feature requests, technical issues, translation files, and preserving the release archive. So if you want to study the full source code, this repo will not give you that. But if you want to find older versions, read issues, or report problems, GitHub is still useful.
- Macs Fan Control official website
- Macs Fan Control download page
- Macs Fan Control GitHub repository
- Macs Fan Control GitHub README
Read the README Before Downloading
I recommend reading the GitHub README first, not because installation is difficult, but because it helps set the right expectations.
The README has roughly three key points:
- The GitHub repo is used to track bugs, feature requests, and technical issues.
- The repo contains translation files, and people who want to help translate can fork it and submit pull requests.
- The release archive lists binaries and release notes for each version.
This also means one thing: do not see GitHub and immediately assume it is a fully open-source tool. It is more like the official place where the issue tracker, translation collaboration, and older downloads are collected. I think this is worth knowing upfront, so you do not click in and think you have gone to the wrong place.
At the time I wrote this article, 2026-06-30, the official download page showed the current version as 1.5.21, updated on 2026-04-13. The macOS version supports macOS 10.13 High Sierra and later, and older versions are available for earlier systems. The Windows version is a bit different: it is intended for Boot Camp environments, and the official download page clearly says it is a 14-day trial, not completely free.
Who This Tool Is For
I personally put Macs Fan Control in the category of tools that should only be opened by people who understand what they are adjusting.
Situations where it fits better:
- You want to see the internal temperature of your Mac instead of guessing by feel.
- You run long compile jobs, video editing, transcoding, or local models, and want the fan to kick in earlier.
- Machines like a Mac mini, MacBook, or iMac feel noticeably warm, and you want to observe CPU / GPU / SSD temperatures.
- You want to make the fan policy a little more active than the system default.
- You need to find an older version or read release notes.
Situations where it is less suitable:
- You have no idea what temperature sensors represent.
- You only want to make the fan quieter and do not care about temperature.
- You want to push RPM and temperature thresholds to random extremes.
- You expect it to automatically decide all the best settings for you.
I do not treat it as a tool that “makes the Mac faster.” It is more like something that helps me understand the cooling state, then slightly tune the cooling policy in a more conservative or more active direction when needed.
What to Look at on the Main Screen
After you open it for the first time, the left side of the main screen is the fan list, and the right side is the temperature sensor list. On my Mac mini, for example, the fan is shown as Exhaust, and next to it I can see the minimum RPM, current RPM, and maximum RPM.
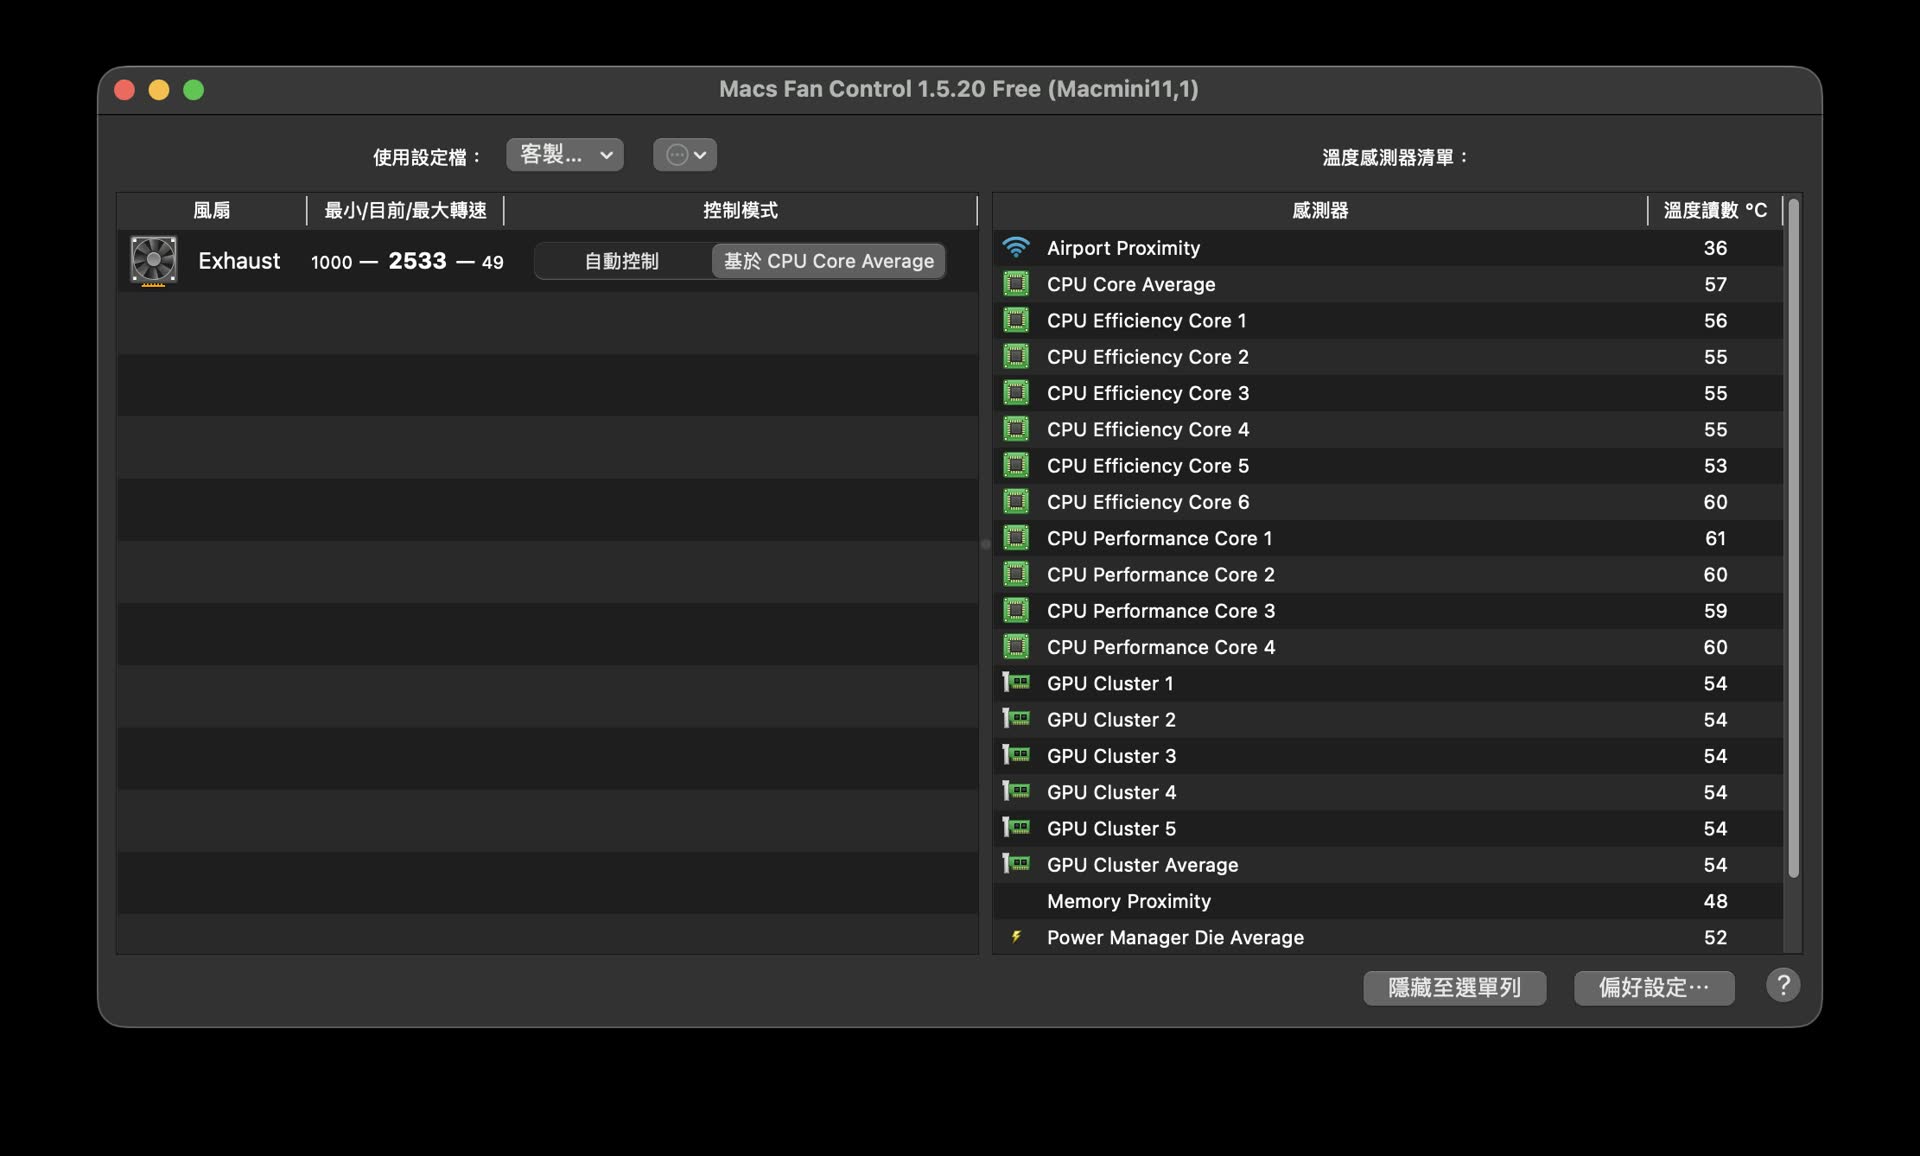
Fans are on the left side of the main screen, and various temperature sensors are on the right
The sensor list on the right may look a bit long at first, with items like CPU Core Average, each efficiency core, performance core, GPU Cluster, Memory Proximity, Power Manager Die Average, and so on. My habit is to look at the average first. I do not start by staring at every single core.
If I just want to confirm whether the machine is running warm right now, CPU Core Average is the most intuitive number for me. It is not the only number worth watching, but compared with checking every core separately, the average is less likely to make you scare yourself.
The Control Modes I Use Most Often
Macs Fan Control has two modes I use more often.
The first is fixed RPM. This is very direct: you lock the fan at a specific speed. It is useful for short tests, but I do not usually leave it like this long-term, because workloads change, and a fixed RPM is not necessarily reasonable in every situation.
The second is automatic control based on sensor values. This is the mode I more often leave enabled. You can choose a sensor, such as CPU Core Average, then set two temperatures:
- Start increasing fan speed above a certain temperature.
- Reach maximum fan speed at another higher temperature.
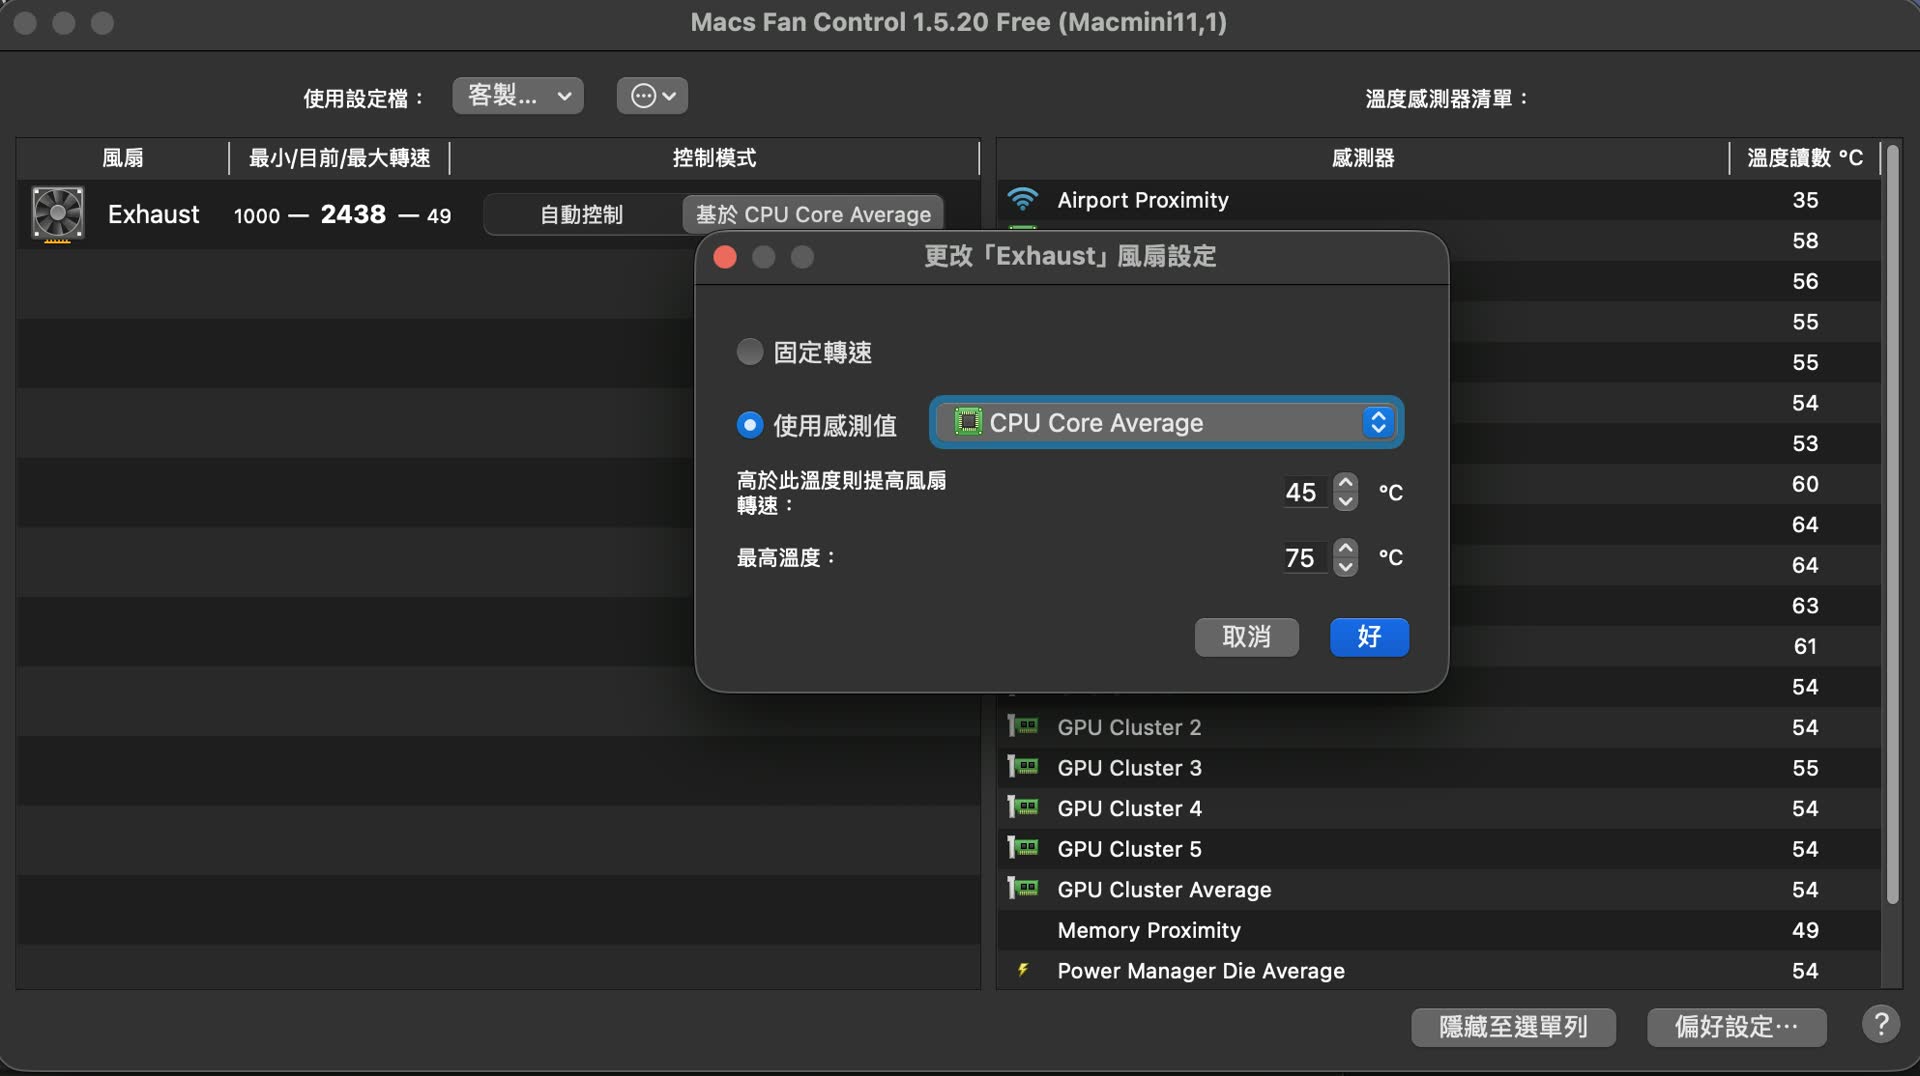
I more often use automatic control based on a sensor, instead of fixed RPM for long periods
I do not make my own settings too aggressive. The example in the screenshot is based on CPU Core Average: start increasing fan speed above 45°C, with the maximum temperature set to 75°C. This does not mean every Mac should copy it exactly. It is just how I use it: let the fan intervene a little earlier, but do not chase low temperatures so hard that the fan runs at high speed all day.
Why It Stayed After a Year
What I like most about it is that it is simple.
The interface is not flashy, and it does not pack in a bunch of dashboards I do not need. When you open it, you see fans, RPM, sensors, and control modes. If I want to check temperature, I check temperature. If I want to adjust the fan policy, I go into the preferences. There is not much extra noise.
Another reason is that it really works well as something you keep installed long-term. For macOS users, the free version already covers the main needs. Over the past year or so, I have not run into anything that made me feel I had to upgrade. If you only want to monitor temperatures and do basic fan control, the free version is smooth enough.
That said, I would not describe it as a cure-all. The Mac’s cooling design already has its own logic. If the body only feels hot occasionally, it is usually more important to first check whether background processes, browser tabs, Docker, transcoding, or indexing services are running, rather than immediately adjusting the fan. Fan control is the last layer of fine-tuning, not the first troubleshooting step.
Safety Boundaries I Pay Attention To
This type of tool can directly change the fan policy, so I set a few boundaries for myself.
First, I do not lower the fan too much just for quietness. A quieter Mac does not mean a healthier machine. Sometimes it just means you delayed the cooling response.
Second, I do not copy someone else’s settings directly. Different Mac models, dust conditions, ambient temperatures, and workloads are all different. Someone else’s 45°C / 75°C may not fit your machine.
Third, observe after making changes. Run the kinds of work you actually do, such as compiling, editing video, opening a lot of browser tabs, or running a local model, and see whether the temperature and RPM remain stable. Do not judge only from nice-looking numbers while idling on the desktop.
Fourth, Windows users need to pay attention to licensing. The official page is very clear: the Windows Boot Camp version is a 14-day trial, not completely free. If you mainly use it on macOS, this does not matter much. If you are a Boot Camp user, do not assume the licensing terms are exactly the same on both sides.
Conclusion
Macs Fan Control is a small tool I will keep on my Mac. It does not have fancy features, but it handles the few things I need very steadily: viewing temperature, viewing RPM, choosing sensors, and adjusting when the fan should step in.
If you just want to make your Mac a little quieter, I would first suggest not rushing into random adjustments. Check the temperature, check the load, understand the sensors, then decide whether to change the fan policy. That is also why I find it useful: it gives you enough control, but it does not take responsibility for the consequences of careless settings.
For me, the best state for this kind of tool is that I usually do not need to manage it, but when I do need it, I can immediately understand what is happening. After more than a year of use, Macs Fan Control still fits that role.