

img2threejs Tested: Can Codex Turn One Image into a Three.js 3D Model?
I tested img2threejs with GPT-5.6 SOL at medium reasoning. Complex subjects such as an F1 car failed quickly, while a simple NES controller produced clickable buttons, multiple views, and an exploded view. This article covers the results, practical limits, and Codex installation.
Introduction
The name img2threejs is very literal: give an agent a reference image and have it rebuild the object as an interactive Three.js 3D model in the browser.
It does not directly convert the photo into a mesh, and it is not photogrammetry. The agent first breaks down the silhouette, parts, materials, and details, then recreates them with Three.js geometry, materials, and code. In theory, the workflow moves through blockout, structure, form, materials, lighting, interaction, and optimization.
For this test, I used GPT-5.6 SOL with medium reasoning. I started with a complicated subject, an F1 car, and the result failed rather clearly. A few wrong curves, body proportions, tires, or aerodynamic parts are enough to make the final model look like a generic race car instead of the specific car in the reference.
I then switched to a much simpler NES controller. I ran one complete task and did not continue with repeated rounds of manual refinement. The result included the shell, D-pad, Select and Start controls, A and B buttons, and cable. It also supported view switching, part selection, and an exploded view. I would not call it polished, but it was acceptable as a rough demo.
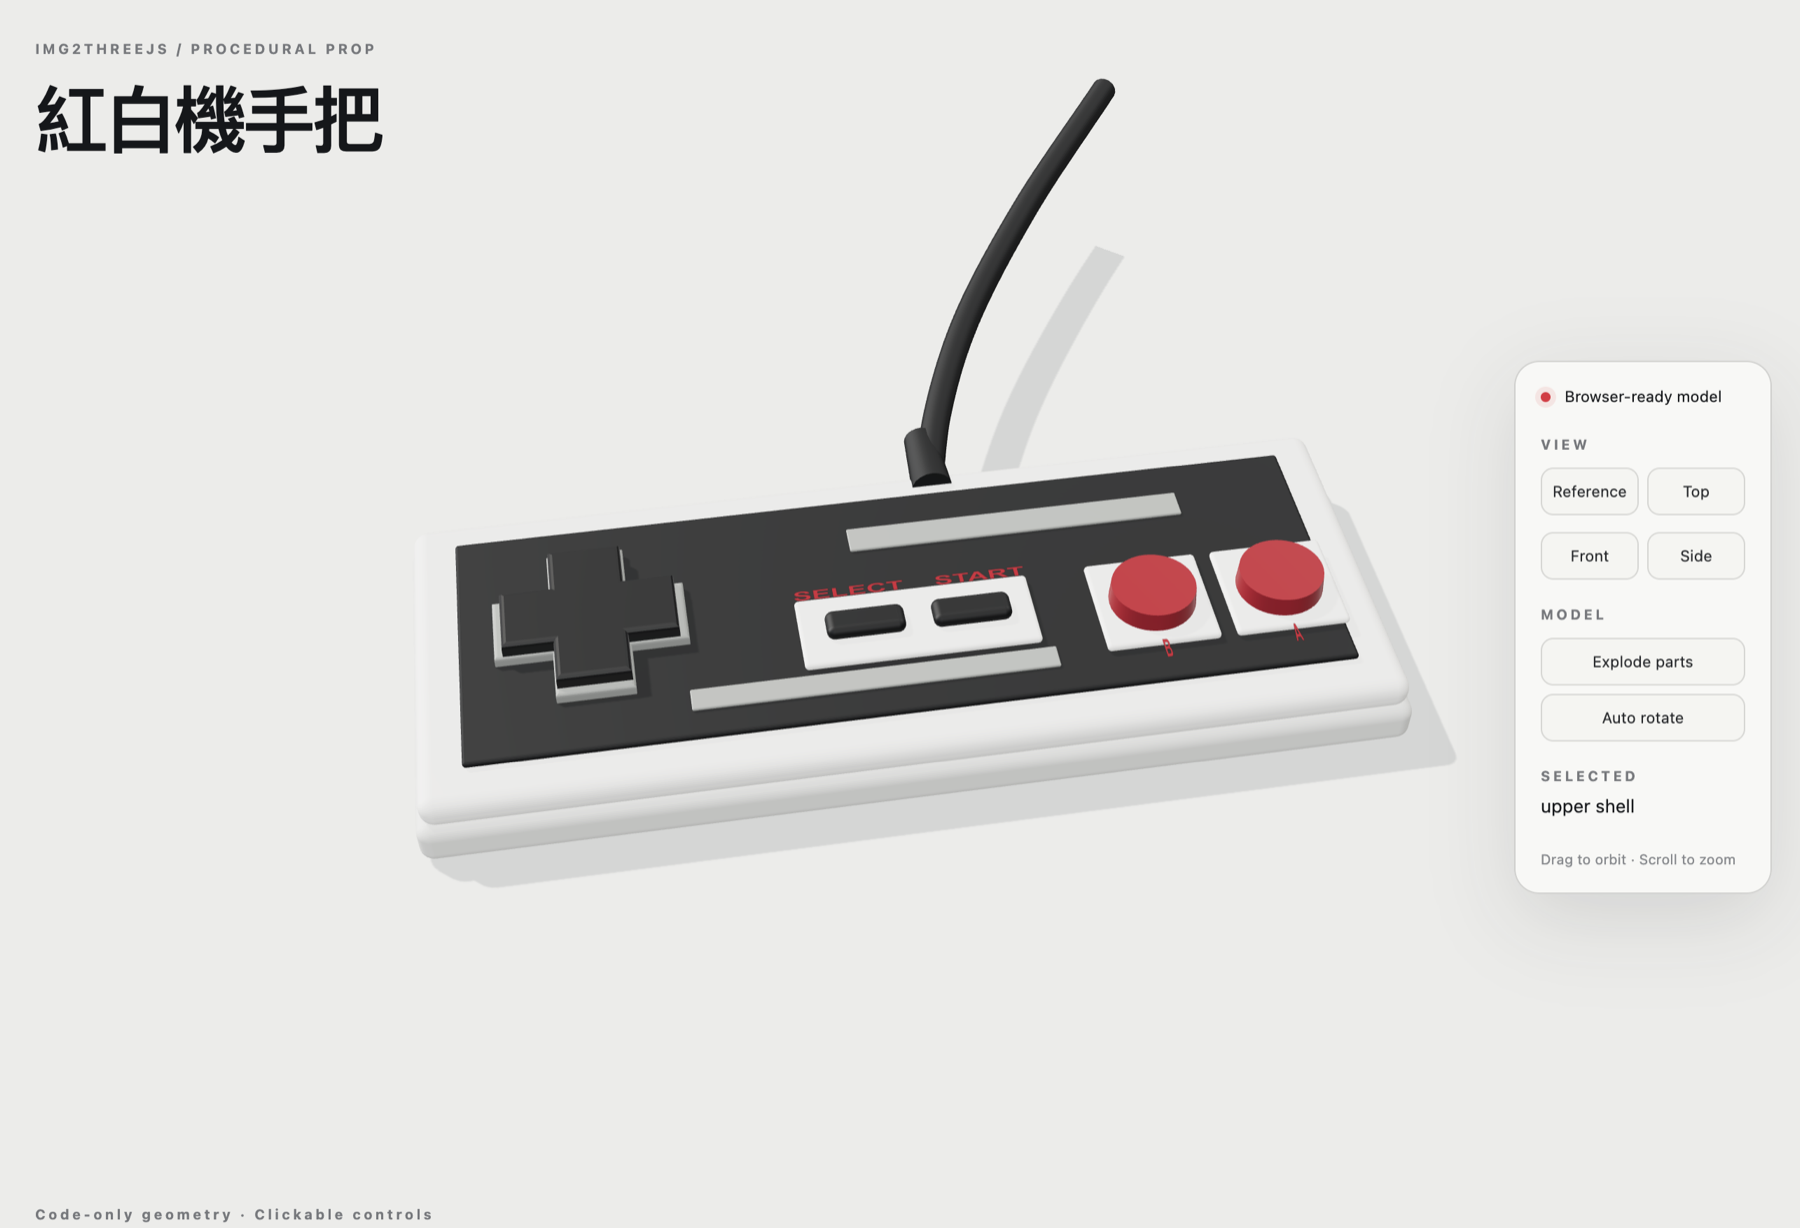
The NES controller generated with GPT-5.6 SOL at medium reasoning
It Rebuilds the Object in Code
This distinction matters. img2threejs does not extract a ready-made model from the image. It asks the agent to inspect the reference and generate a THREE.Group factory. The model is made from primitives, procedural materials, and generated geometry, so the output is source code rather than a downloaded .glb or .obj file.
The official pipeline first checks whether the image is suitable for reconstruction. It then builds a detail inventory covering features such as bevels, seams, buttons, labels, and material differences. After that, it creates a spec and builds the model in stages, with browser screenshots compared against the reference at each stage.
The useful part is not only that an AI agent can produce a 3D-looking object. The project also tries to create a usable model hierarchy. Parts have names, hierarchy, pivots, sockets, and colliders, which makes the output easier to animate, interact with, or disassemble than one static mesh.
My Test: The F1 Car Failed, the NES Controller Worked Better
I chose the wrong first subject and tested an F1 car.
An F1 car is not recognizable from the body silhouette alone. The front wing, rear wing, sidepods, Halo, tire proportions, and aerodynamic surfaces all contribute to its identity. If several of those parts are missing or misplaced, the result may still look like a race car, but not the one in the image. A single reference image also hides a large amount of geometry, leaving the agent to infer it.
The NES controller is much simpler. Its main body is close to a flat rectangular box, and the front components are easy to identify:
- Off-white shell and black face panel
- D-pad on the left
- Select and Start buttons in the center
- Red B and A buttons on the right
- Cable leaving the rear edge
The clean silhouette and clear control layout made this a better procedural reconstruction target
The agent created the main controls as separate parts. The A and B buttons can be clicked, and the viewer includes Reference, Top, Front, and Side views. Pressing Explode parts separates the shell, panel, and controls into layers; pressing it again assembles them.
Those interactions are more useful than a single 3D screenshot. The result can support a short demo recording or become the starting point for another Three.js scene.
There are still visible differences. My generated shell is too thick, the button heights and material response do not fully match the reference, and the label placement is only approximate. I would not use this version directly as a production game asset or product visualization.
Why the Official Demos Look Better
The Glock-18, BMX, knife, earbuds, and environment models in the official gallery all look more complete than the controller from my test.
The README does not tell me which model was used for every showcase item or exactly how many refinement rounds each one received, so I cannot claim the difference comes from one specific model. What is clear is that the official workflow includes staged comparison and self-correction. Repeatedly fixing the silhouette, parts, and materials after each review should produce a better result than stopping after one task because the model already moves.
My test is closer to how many people will use the project immediately after installation: attach an image, describe the object, and let the agent finish the task. Under those conditions, a simple object may produce a useful first draft. A complex object depends much more heavily on the model, reference coverage, reasoning effort, and number of correction rounds.
Installing img2threejs in Codex
The source and official instructions are available in the img2threejs GitHub repository. The installation is simple: the main step is git clone.
Current Codex documentation recommends storing personal skills under ~/.agents/skills. Create the directory and clone the repository into it:
mkdir -p ~/.agents/skills
git clone https://github.com/img2threejs/img2threejs.git \
~/.agents/skills/img2threejs
Codex normally detects skill changes automatically. If img2threejs does not appear in the skill list, restart Codex.
Attach a reference image to a task, then invoke the skill with the object name:
$img2threejs NES controller
You can also describe the acceptance criteria more explicitly:
$img2threejs
Rebuild the object in this reference image as an interactive Three.js model.
Lock the shell proportions, control layout, and cable direction first.
Provide front, top, and exploded views, then list the remaining differences
from the reference.
The validation scripts in the repository require Python 3.10 or newer and do not need a large set of additional Python packages. If the agent also creates a Vite and Three.js preview project, you will still need Node.js and npm to install the frontend dependencies and run the browser preview.
To update an existing installation:
git -C ~/.agents/skills/img2threejs pull
Better Subjects for a First Test
I would start with objects that have a clear silhouette, distinct components, and surfaces that do not require photographic realism:
- Game controllers, retro cameras, and radios
- Chests, barrels, and vending machines
- Simple furniture and industrial equipment
- Low-poly cars, drones, and robots
- Game props such as swords, shields, and helmets
I would not start with an F1 car, a real person, an animal, or consumer electronics that depend on very subtle curves. These subjects are not impossible, but one image leaves too much hidden, and small shape errors are immediately visible.
The references also affect the result directly. A clean background, a complete subject, sufficient resolution, and separate front, side, and rear views give the agent much more useful evidence than one angled photo.
Where img2threejs Fits for Me
If the expectation is that any photo can become a production-ready 3D asset with one command, my answer after this test is no.
If the goal is to quickly create a rotatable, clickable, and explodable Three.js prototype, the project is interesting. The NES controller still lacks refined details and materials, but it is enough for a demo, an interaction test, or a first draft for manual editing.
I would not use this result to claim that the project replaces 3D modeling, and I would not dismiss it entirely because the F1 car failed. For now, it works better as a way for an agent to assemble a procedural 3D draft. The simpler the object, the more likely that draft is to save time.

