CodexBar Hands-On: Monitor Quotas for 53 AI Coding Services from the macOS Menu Bar
CodexBar is an open-source macOS menu bar tool that tracks usage windows, credit balances, and reset countdowns for AI coding services such as Codex, Claude, Cursor, and Copilot in real time. This article walks through the installation flow, permissions, and provider setup based on hands-on testing.
Introduction
If you use several AI coding tools at the same time, such as Codex, Claude Code, Cursor, and Copilot, the most annoying problem often is not "which model is stronger," but how much quota is left, and when it resets.
The official dashboards are scattered across different platforms. Some show a session window, some show a weekly quota, and some require logging into a separate billing page. Before starting a long task, you often have to guess.
CodexBar is an open-source macOS menu bar tool built for exactly this. It brings the usage windows, credit balances, and reset countdowns for 53 AI coding providers into one menu bar view. There is no Dock icon, no extra browser tab for checking billing, and you can tell at a glance whether it is a good time to start a bigger task.
Here is a hands-on demo video of CodexBar:
Why Use CodexBar?
AI coding tools all handle billing and limits differently. Codex has a 5-hour session window, Claude has weekly limits, and Cursor is tied to a subscription cycle. Without centralized monitoring, developers can easily discover halfway through a task that their quota has run out.
The core problems CodexBar solves can be summarized in three points:
| Pain Point | Without CodexBar | With CodexBar |
|---|---|---|
| Quota visibility | You have to log into each platform dashboard separately | Expand from the menu bar with one click and view all providers side by side |
| Reset time | Each platform has a different cycle, which is hard to remember | Each provider shows a countdown, such as "resets in 13d 21h" |
| Using multiple tools | Switching tabs and accounts breaks the workflow | Merge Icons mode lets one menu bar icon switch across everything |
CodexBar also uses a privacy-first design: it reuses your existing login state, such as OAuth, CLI credentials, browser cookies, or API keys. It does not store passwords, and it does not scan your whole disk in the background.
CodexBar Core Features
Real-Time Monitoring Across Providers
CodexBar currently supports 53 AI coding-related providers, including:
- CLI tools: Codex, Claude Code, Gemini CLI, Kiro, Augment, and more
- IDEs / editors: Cursor, Zed, JetBrains AI, Windsurf
- Subscription services: Copilot, OpenCode, MiniMax, z.ai, Kimi, and more
- API platforms: OpenAI, OpenRouter, LiteLLM, DeepSeek, ElevenLabs, and more
Each provider can appear as its own menu bar status item, or you can enable Merge Icons mode to combine all providers into one icon and browse them quickly through a switcher.
Usage Windows and Reset Countdowns
For each enabled provider, CodexBar shows:
- Usage progress bars for Session, Weekly, Monthly, and other levels
- Remaining percentage, such as Premium Usage 74% left
- Countdown to the next reset, such as Resets in 13d 21h
This lets you decide directly before starting a long task whether to begin now or wait until after the reset.
Extra Advanced Features
- Spend and Cost charts: Providers with API support, such as OpenAI Admin API, Claude Admin API, and OpenRouter, can show inline spending charts
- Provider Status polling: When a service has an outage, the menu bar icon shows an incident badge
- CLI tool: Includes the
codexbarcommand line tool for querying quota in scripts or CI, with separate tarballs for macOS and Linux - WidgetKit widgets: Supports macOS desktop widgets
- 21 languages: Includes Traditional Chinese, with the website and app sharing the same localization directory
Download and Installation
System Requirements
- GUI version: macOS 14+ (Sonoma or later)
- CLI version: macOS or Linux (aarch64 / x86_64)
Method 1: Homebrew (Recommended)
brew install --cask codexbar
For later updates:
brew upgrade --cask codexbar
Method 2: Manual Download from GitHub Releases
Go to the GitHub Releases page and choose the matching version from the Assets section:
- CodexBar-macos-universal-x.x.x.zip: Universal version with a GUI, works on both Apple Silicon and Intel
- CodexBarCLI-v{version}-macos-arm64.tar.gz: CLI only, suitable for scripts or terminal use
- CodexBarCLI-v{version}-linux-x86_64.tar.gz: Linux CLI version
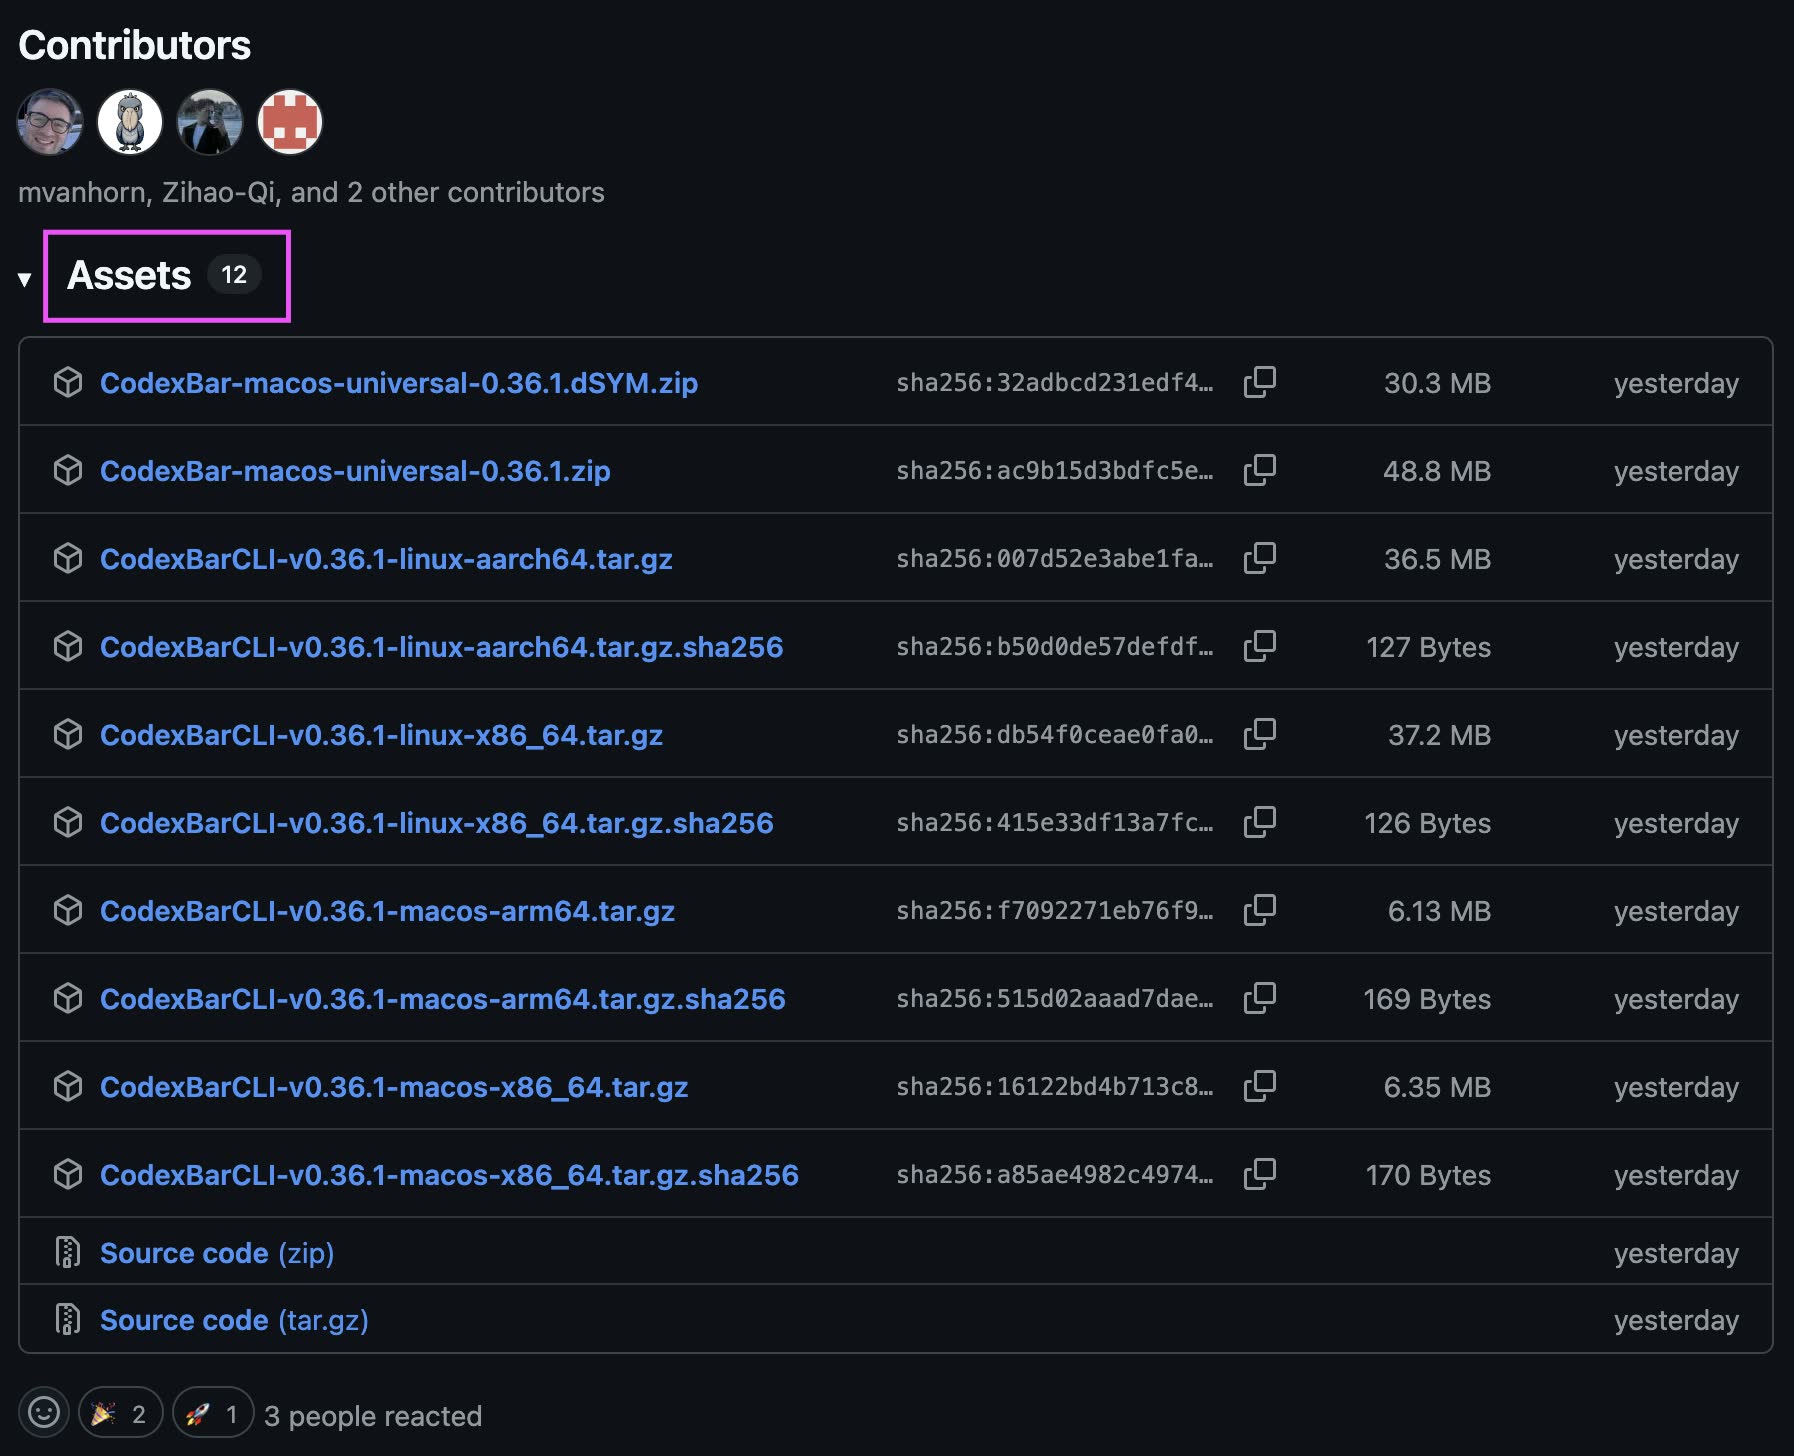
In the Releases Assets section, choose the Universal version with GUI or the CLI Tarball
After downloading the Universal version, unzip it and drag CodexBar.app into the "Applications" folder.
Linux CLI Installation
brew install steipete/tap/codexbar
Arch Linux users can also install it through AUR:
yay -S codexbar-cli
Step-by-Step Setup Guide
The following uses the macOS GUI version as an example and walks through the full flow from first launch to successfully monitoring providers.
Step 1: Authorize Keychain Access
On first launch, macOS may show a Keychain prompt asking CodexBar to read the browser's "Safe Storage" key, such as Chrome Safe Storage. This is used to parse browser cookies and obtain the login state for web-based providers such as Cursor and Copilot.
Enter your macOS login password and click 允許. If you do not want to be asked repeatedly later, click 永遠允許 instead.
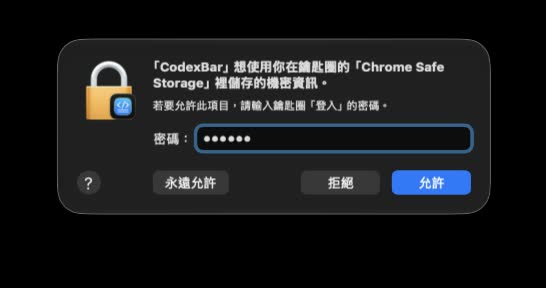
Authorize Keychain on first launch so CodexBar can read browser cookies and detect web-based providers
If the Keychain prompt keeps appearing and "永遠允許" does not stick, you can enable Disable Keychain access under CodexBar → Settings → Advanced → Keychain access. In this mode, browser cookie-based providers will be skipped, but CLI OAuth for Claude/Codex will still work normally.
Step 2: Open Settings
Click the CodexBar icon in the menu bar, then choose 設定... at the bottom of the pop-up menu. The shortcut is ⌘,.
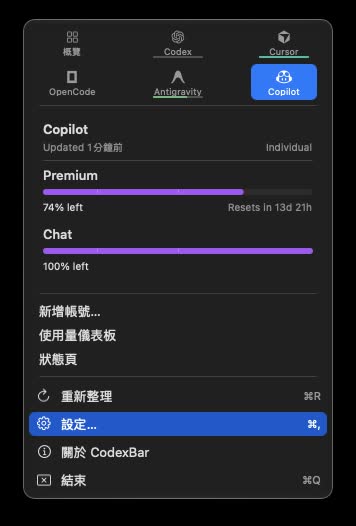
Click the menu bar icon and choose 「設定...」 from the bottom menu to open preferences
Step 3: Enable the Providers You Need
In the settings window, switch to the Providers tab. The left side lists all supported AI services, and the right side shows detailed settings for the selected provider.
Check the providers you actually use and want to monitor. CodexBar reads usage automatically from CLI credentials, OAuth, browser cookies, or API keys depending on each provider's authentication method.
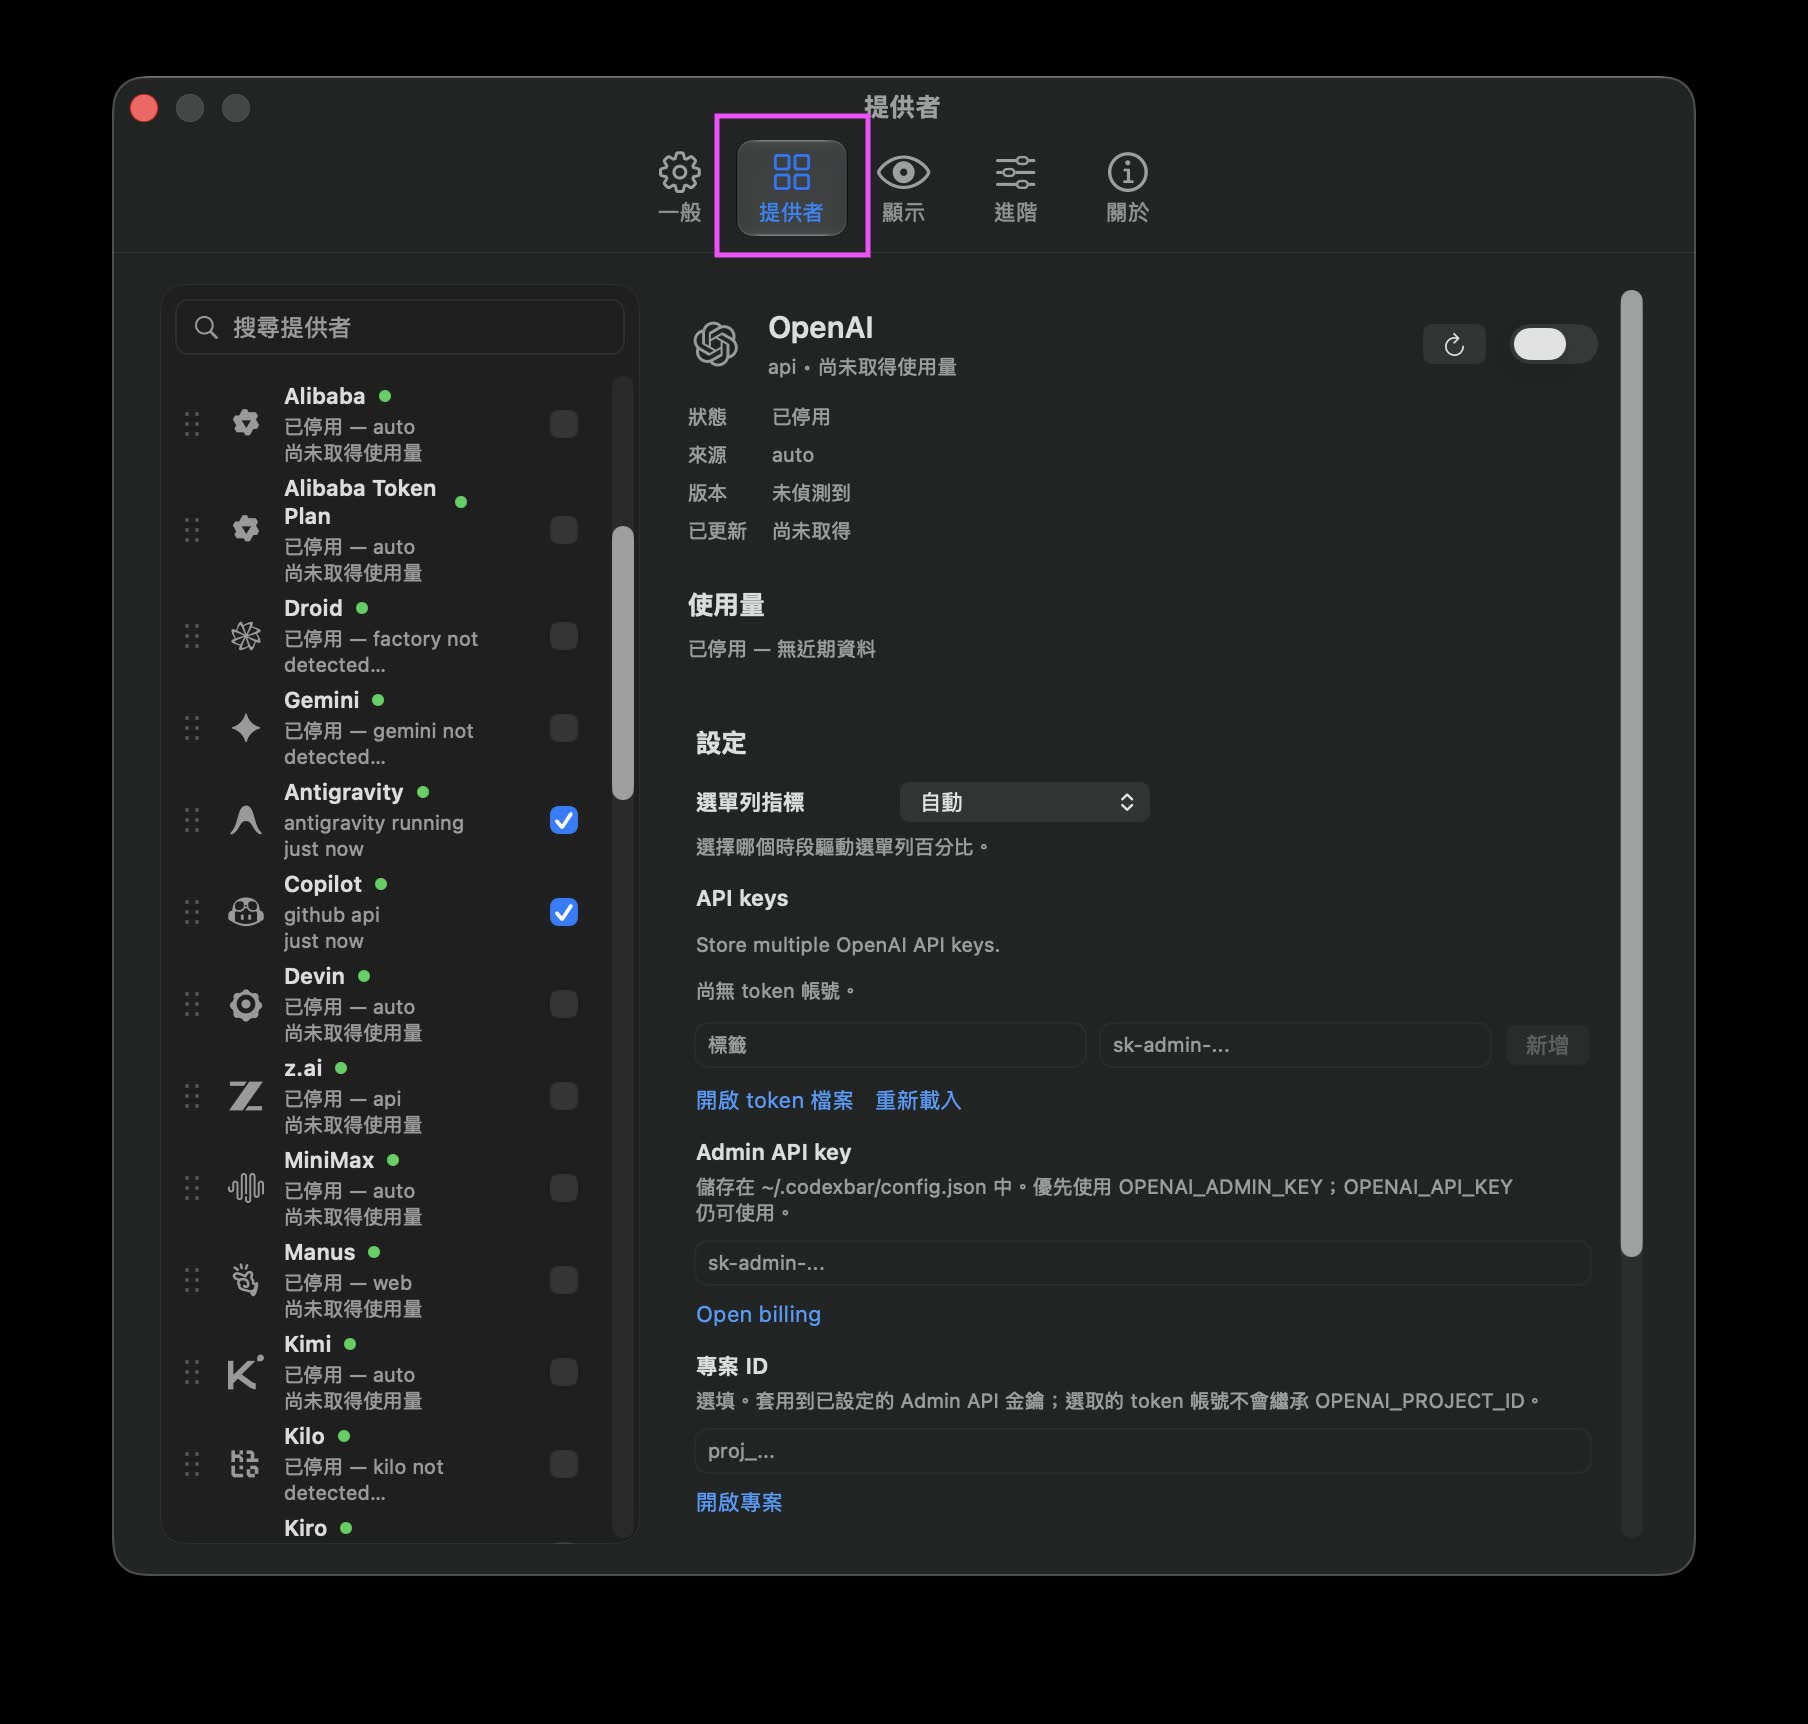
In the Providers tab, check the services you want to monitor. The right side lets you configure API keys and menu bar metrics
Some providers require extra preparation:
- Codex / Claude: Install and log into the corresponding CLI locally first (
~/.codex,~/.claude) - Cursor / Copilot: Requires a valid browser login session
- OpenAI Admin API: Enter an
sk-admin-...key in settings, or set theOPENAI_ADMIN_KEYenvironment variable - API key-based providers such as DeepSeek and OpenRouter: Enter the key in the Settings section on the right
After setup is complete, return to the menu bar and you should see each provider's usage progress bar and reset countdown.
Quick CLI Commands
CodexBar includes the codexbar CLI, which is useful for querying quota in scripts or CI. After installing the GUI version, run:
./bin/install-codexbar-cli.sh
Common commands:
# List enabled providers
codexbar config providers

# Enable / disable providers
codexbar config enable --provider grok
codexbar config disable --provider cursor

# Set an API key from stdin, without writing it to shell history
printf '%s' "$ELEVENLABS_API_KEY" | codexbar config set-api-key --provider elevenlabs --stdin

# Query local cost usage
codexbar cost --provider codex
codexbar cost --provider claude
Config file location: new installations default to ~/.config/codexbar/config.json; the older path ~/.codexbar/config.json remains compatible.
Privacy and macOS Permissions
CodexBar does not scan your whole disk. It only reads small amounts of data from known locations when the relevant features are enabled:
- Browser Cookies / Local Storage
- Provider CLI config files, such as
~/.codexand~/.claude - Local JSONL logs
macOS permissions that may be triggered:
| Permission | Purpose | Required? |
|---|---|---|
| Keychain access | Decrypt Chromium browser cookies and Claude OAuth credentials | Needed when using cookie-based providers |
| Full Disk Access | Read Safari cookies | Optional; not needed if you do not use Safari |
| Files and Folders | Some CLI helpers read project directories | Depends on the provider, not a background scan |
For a detailed privacy audit, see GitHub Issue #12.
FAQ
Does CodexBar Support Windows?
The official macOS GUI version only supports macOS 14+. Windows users can refer to the official port Win-CodexBar. For Linux desktops, there are third-party integrations such as Waybar and GNOME Shell, all using the CodexBar CLI underneath.
Why Does a Provider Show "Disabled" or "Not Detected"?
This usually means CodexBar cannot find the matching authentication source. Check that:
- The provider is enabled in settings
- The corresponding CLI is installed and logged in, or the API key has been entered
- For cookie-based providers, the browser session is still valid and Keychain authorization has been completed
What Is Merge Icons Mode?
By default, each provider takes one menu bar icon. After enabling Merge Icons, all providers are combined into one icon, and clicking it lets you browse usage across providers through a switcher. This is useful if your menu bar space is limited.
Can I Use Only the CLI Without the GUI?
Yes. Download the CodexBarCLI tarball directly from Releases, extract it, and add codexbar to your PATH. On Linux, you can also install it through Homebrew or AUR.
Closing Thoughts
For developers who use several AI coding tools heavily, CodexBar solves a very practical problem: know whether you have enough quota before starting a long task.
It brings quotas, reset times, and credit balances scattered across platforms into one macOS menu bar pop-up. Configure providers once, and every click after that gives you the full picture, without guessing "can I still use Copilot this week?" or "when does the Codex 5-hour window reset?"
If you also switch between multiple AI coding services, CodexBar is worth trying in your menu bar.
The software project introduced in this article is open source under the MIT License and was created by Peter Steinberger (steipete). Feel free to visit GitHub and give the project a Star to support open-source work.