Fan Control Hands-On: Detailed Fan Curves and Hardware Temperature Control on Windows
I tested Fan Control, a Windows fan control tool, from downloading the installer from GitHub Releases, installing it, switching to Traditional Chinese, auto-calibrating fans, creating curves, to adjusting monitoring cards and fan strategies in actual use.
Introduction
A while ago I wrote about Macs Fan Control on macOS. This time I moved over to Windows to look at another tool with a very direct name: Fan Control.
Fan Control is a Windows fan control app focused on deep customization. It can read temperature sources from the CPU, GPU, motherboard, drives, and more, then apply those temperatures to different fan curves. You can make case fans follow CPU temperature, make some fans watch GPU temperature, or even mix multiple sensors or curves together and use the maximum value, average value, or other methods to decide the final output.
My feeling after testing it this time: it really is much more detailed than typical motherboard software or BIOS fan settings, but it also expects you to know what you are adjusting. It is a good fit for people who want to seriously tune fan curves on a Windows desktop. It is less suitable if you just want to press one “make it quiet” button and be done.
- Fan Control GitHub Releases repository
- Fan Control Releases download page
- Fan Control official documentation
First, a clarification: the app itself is not open source
Fan Control’s GitHub repository is named FanControl.Releases. It looks a lot like a normal open source project, but the official README says very clearly: the source code of Fan Control itself is closed source.
So I am not going to introduce it as an open source tool in this article. This repo is more like a central place for releases, issues, documentation, and related information. It contains FanControl.zip, the installer, Updater, README, license, plugin information, and compatibility notes, but it is not the full source code repository.
I think this is worth knowing upfront, because many people see GitHub and instinctively assume “I can read the source.” Fan Control is not that case. You can download it from GitHub Releases, read version updates, and browse issues, but do not expect to study the full main program inside the repo.
At the time I wrote this article, 2026-07-01, the latest version on GitHub Releases was V270, released on 2026-06-15. The main updates in that release include an option to restart the service on exit and bug fixes. The official README also notes that Fan Control supports Windows 10 and Windows 11.
Download the installer from Releases
To download it, go to the Releases page and find the Assets section for the latest version. You will usually see different installation files there, such as an installer version, versions with different .NET runtime requirements, or a portable zip version.
This time I used the installer route, which is more straightforward for most users. After you see installer.exe, download it and run the installer to get started.
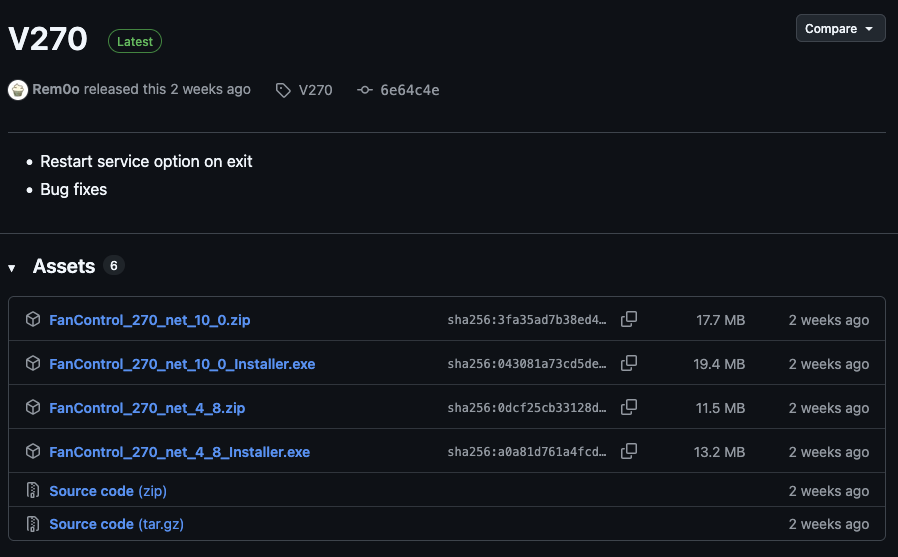
Find installer.exe under Assets on the Releases page
If you see different .NET versions, do not worry too much. In simple terms, some versions depend on a newer .NET runtime, while some are for older environments. For most Windows 10 / Windows 11 users, I would first choose the newest installer most clearly recommended on the official release page. If it does not open, then go back and check whether you need the .NET 4.8 version or an additional runtime.
The installation flow is straightforward
After opening the installer, the first step shows the license and installation prompt. Accept it, keep clicking Next, and you can basically finish the installation.
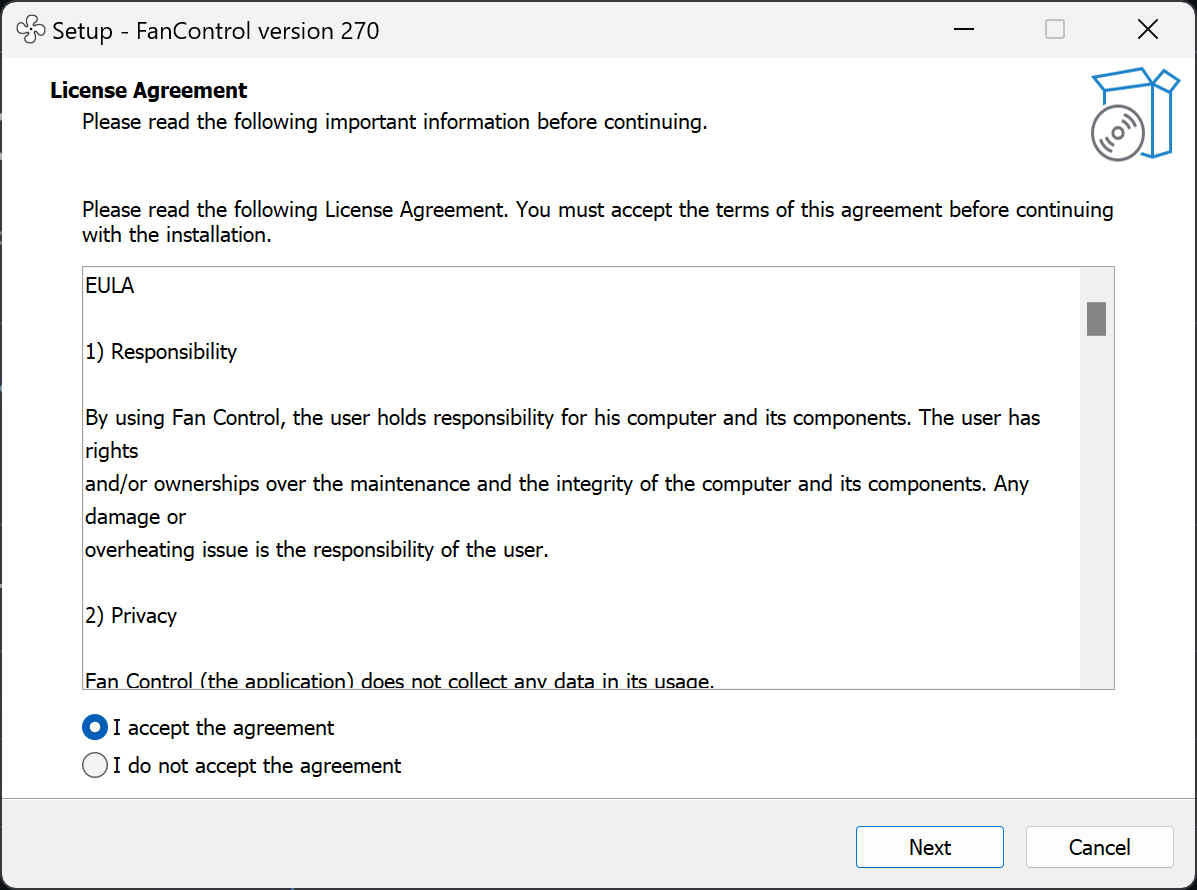
With the installer version, accept the terms and keep going through Next
The official README also lists other installation methods, such as the portable zip, Scoop, and Winget. The Winget command is:
winget install Rem0o.FanControl
If you like keeping tools managed by a package manager, Winget is very convenient. But in this article I follow the installer flow shown in the screenshots, because it is closer to the path most people will take when trying it for the first time.
Switch to Traditional Chinese the first time you open it
Fan Control has many features. The English interface is usable, but for first-time setup I recommend going into settings and switching the language first. Scroll down in the settings page and you can find the language option, which includes Traditional Chinese.

You can switch languages in settings; scroll down and you will see Traditional Chinese
After switching, go back to the main screen and many terms become easier to understand, such as control, speed, curve, sensor, calibration, and so on. Fan Control’s strength is that it breaks many low-level fan controls into cards and curves. If you are not familiar with the language, the first look can feel a bit like walking into a control panel full of knobs.
My own habit is: do not rush to change values. Let it scan the hardware first, and see which fan controls, RPM speed sensors, and temperature sources it detects. Different motherboards, GPUs, fan hubs, and liquid cooling controllers will expose different things.
Auto-calibrating fans is important
Fan Control does not just let you manually drag a percentage. The official documentation mentions that fan calibration finds the fan’s start point, stop point, maximum and minimum speeds, and builds the relationship between RPM and percentage. This is important later if you want to use RPM mode or precise curves.
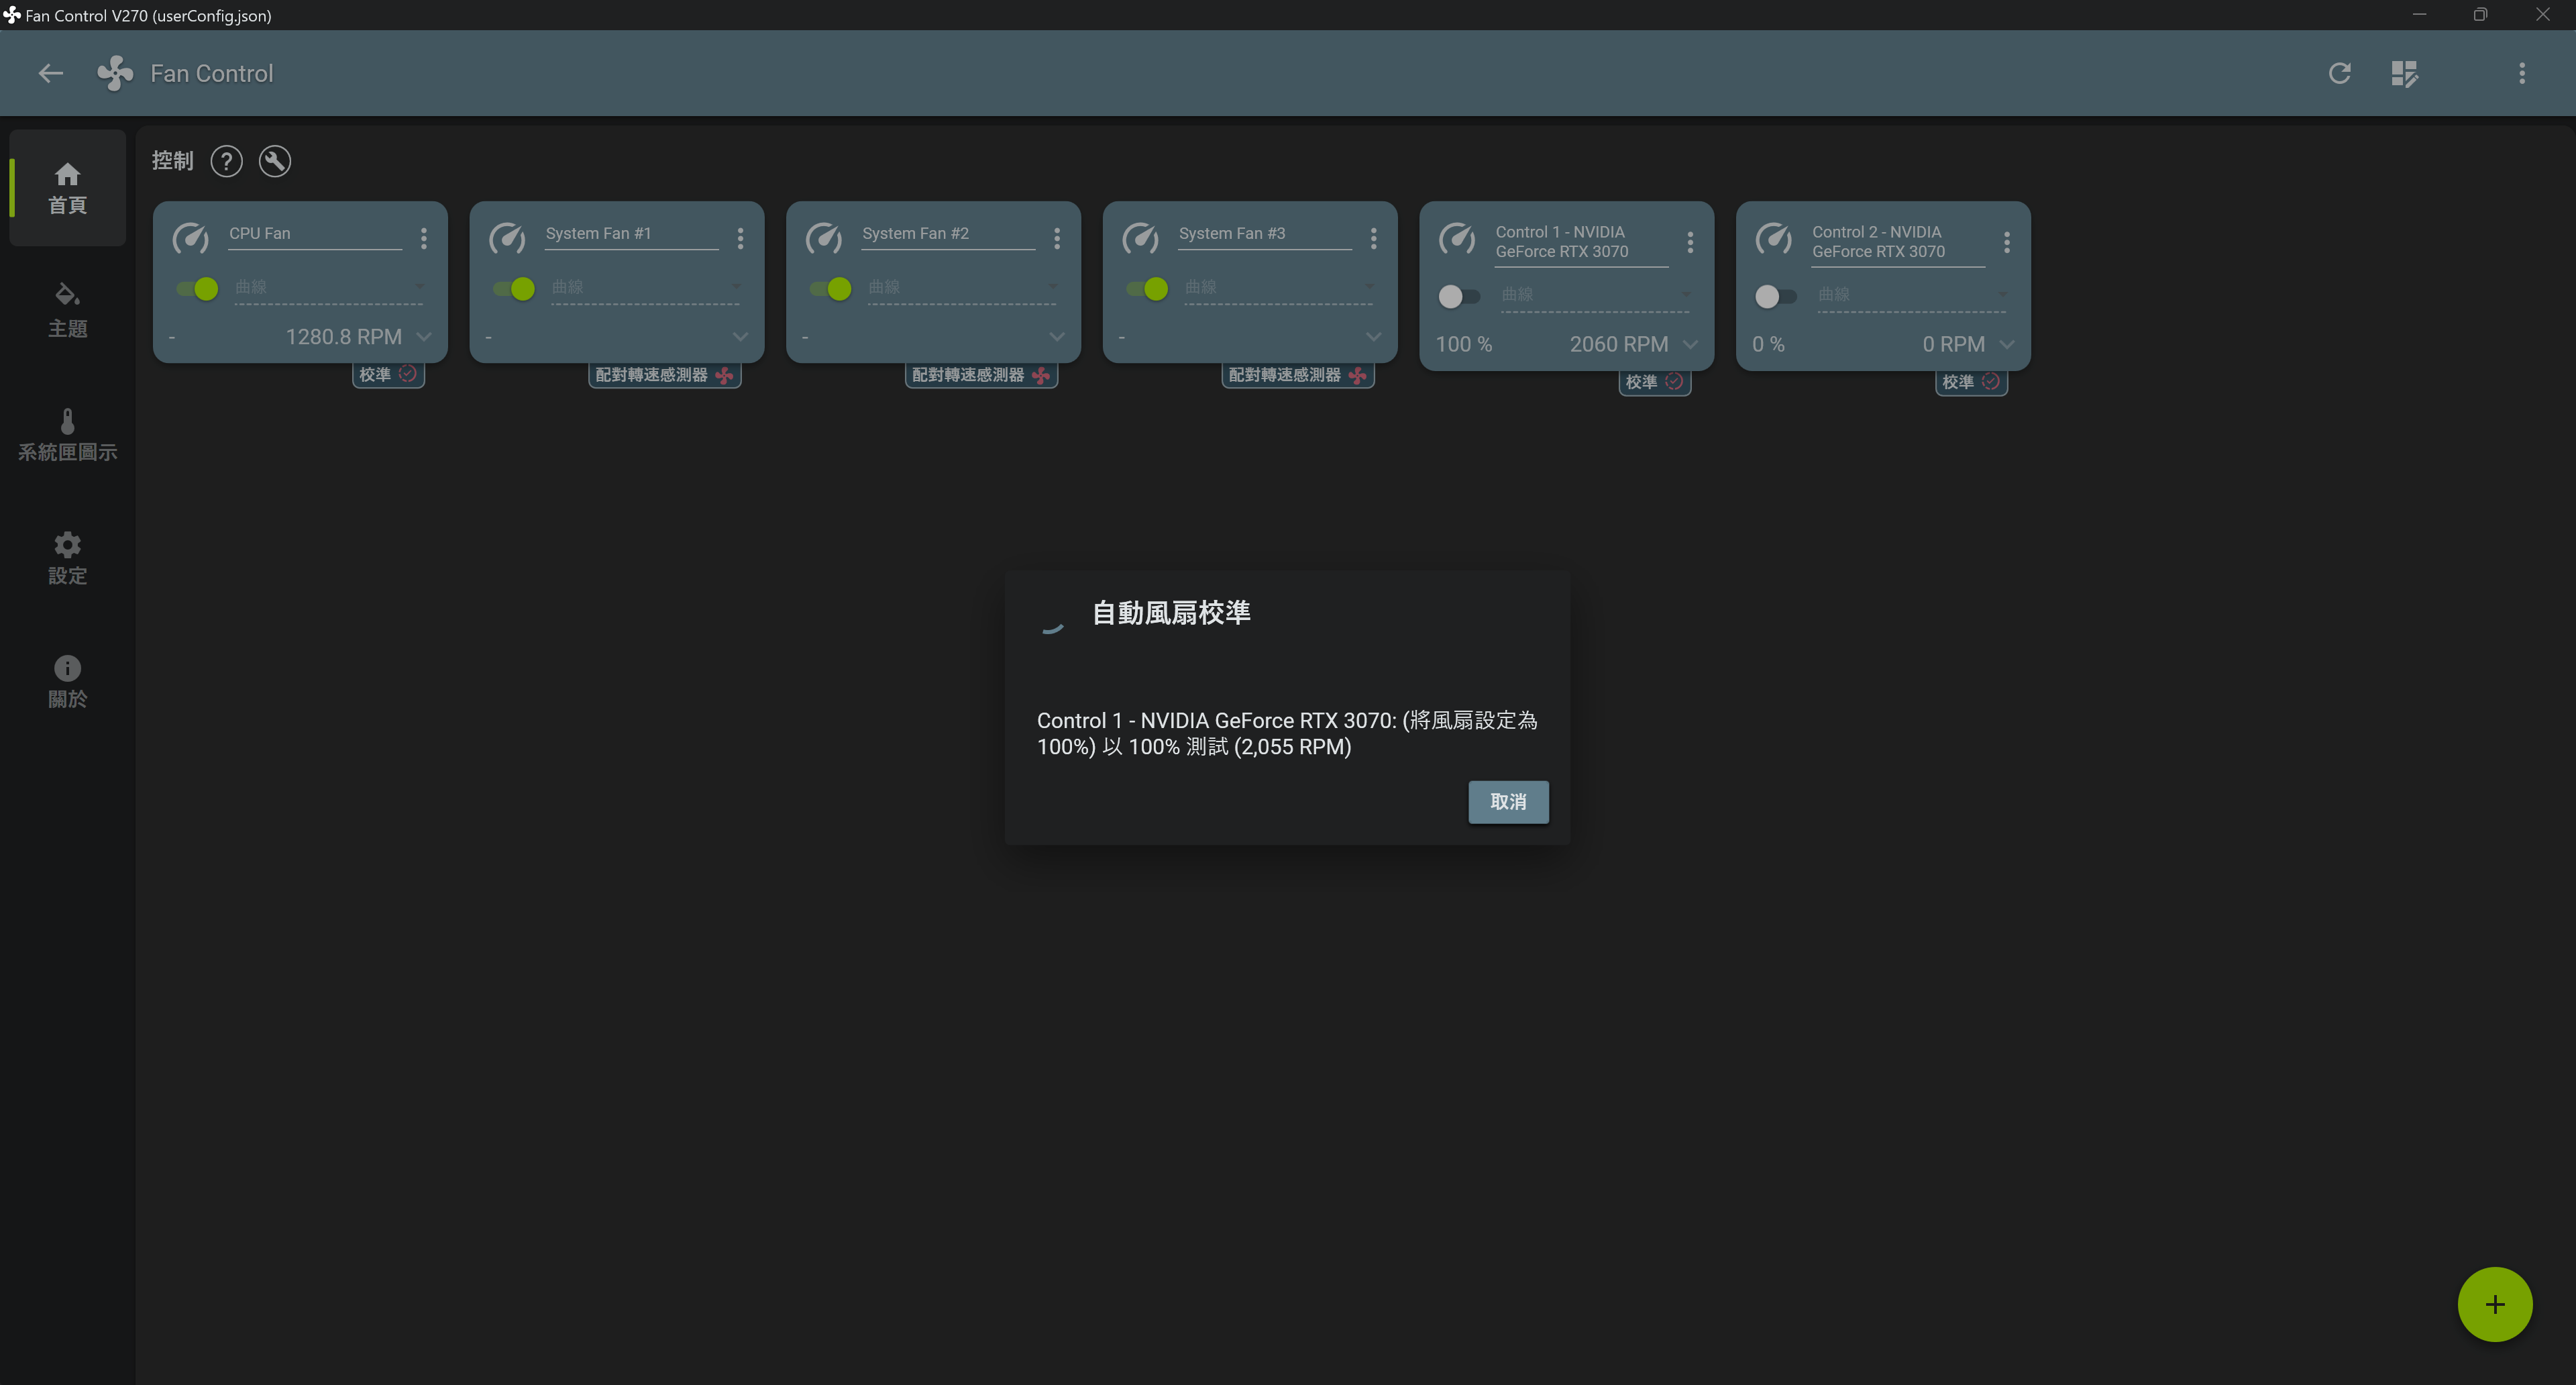
After returning to the main screen, first look at the control cards and auto-calibration settings
I do not think this step should be skipped. Every fan is different. Some can start spinning at 20%, while others need 35% to stay stable. Some have resonance noise at low RPM, while others are especially loud in a certain range. Fan Control also supports more advanced control parameters, such as step up, step down, start %, stop %, response time, and hysteresis. These are used to prevent fans from ramping up and down too abruptly, oscillating back and forth, or getting stuck at awkward speeds.
If you just draw a random line, it might look usable in the short term, but over time you will run into two kinds of problems: the fan keeps jumping whenever temperature changes, or some fans cannot start at low speed. Calibration means understanding the hardware behavior first, then talking about curves.
Curves are where Fan Control stands out
In the lower-right corner of Fan Control’s main screen, you can choose which curves to monitor or apply. It supports many kinds of fan curves, not just a simple linear curve.
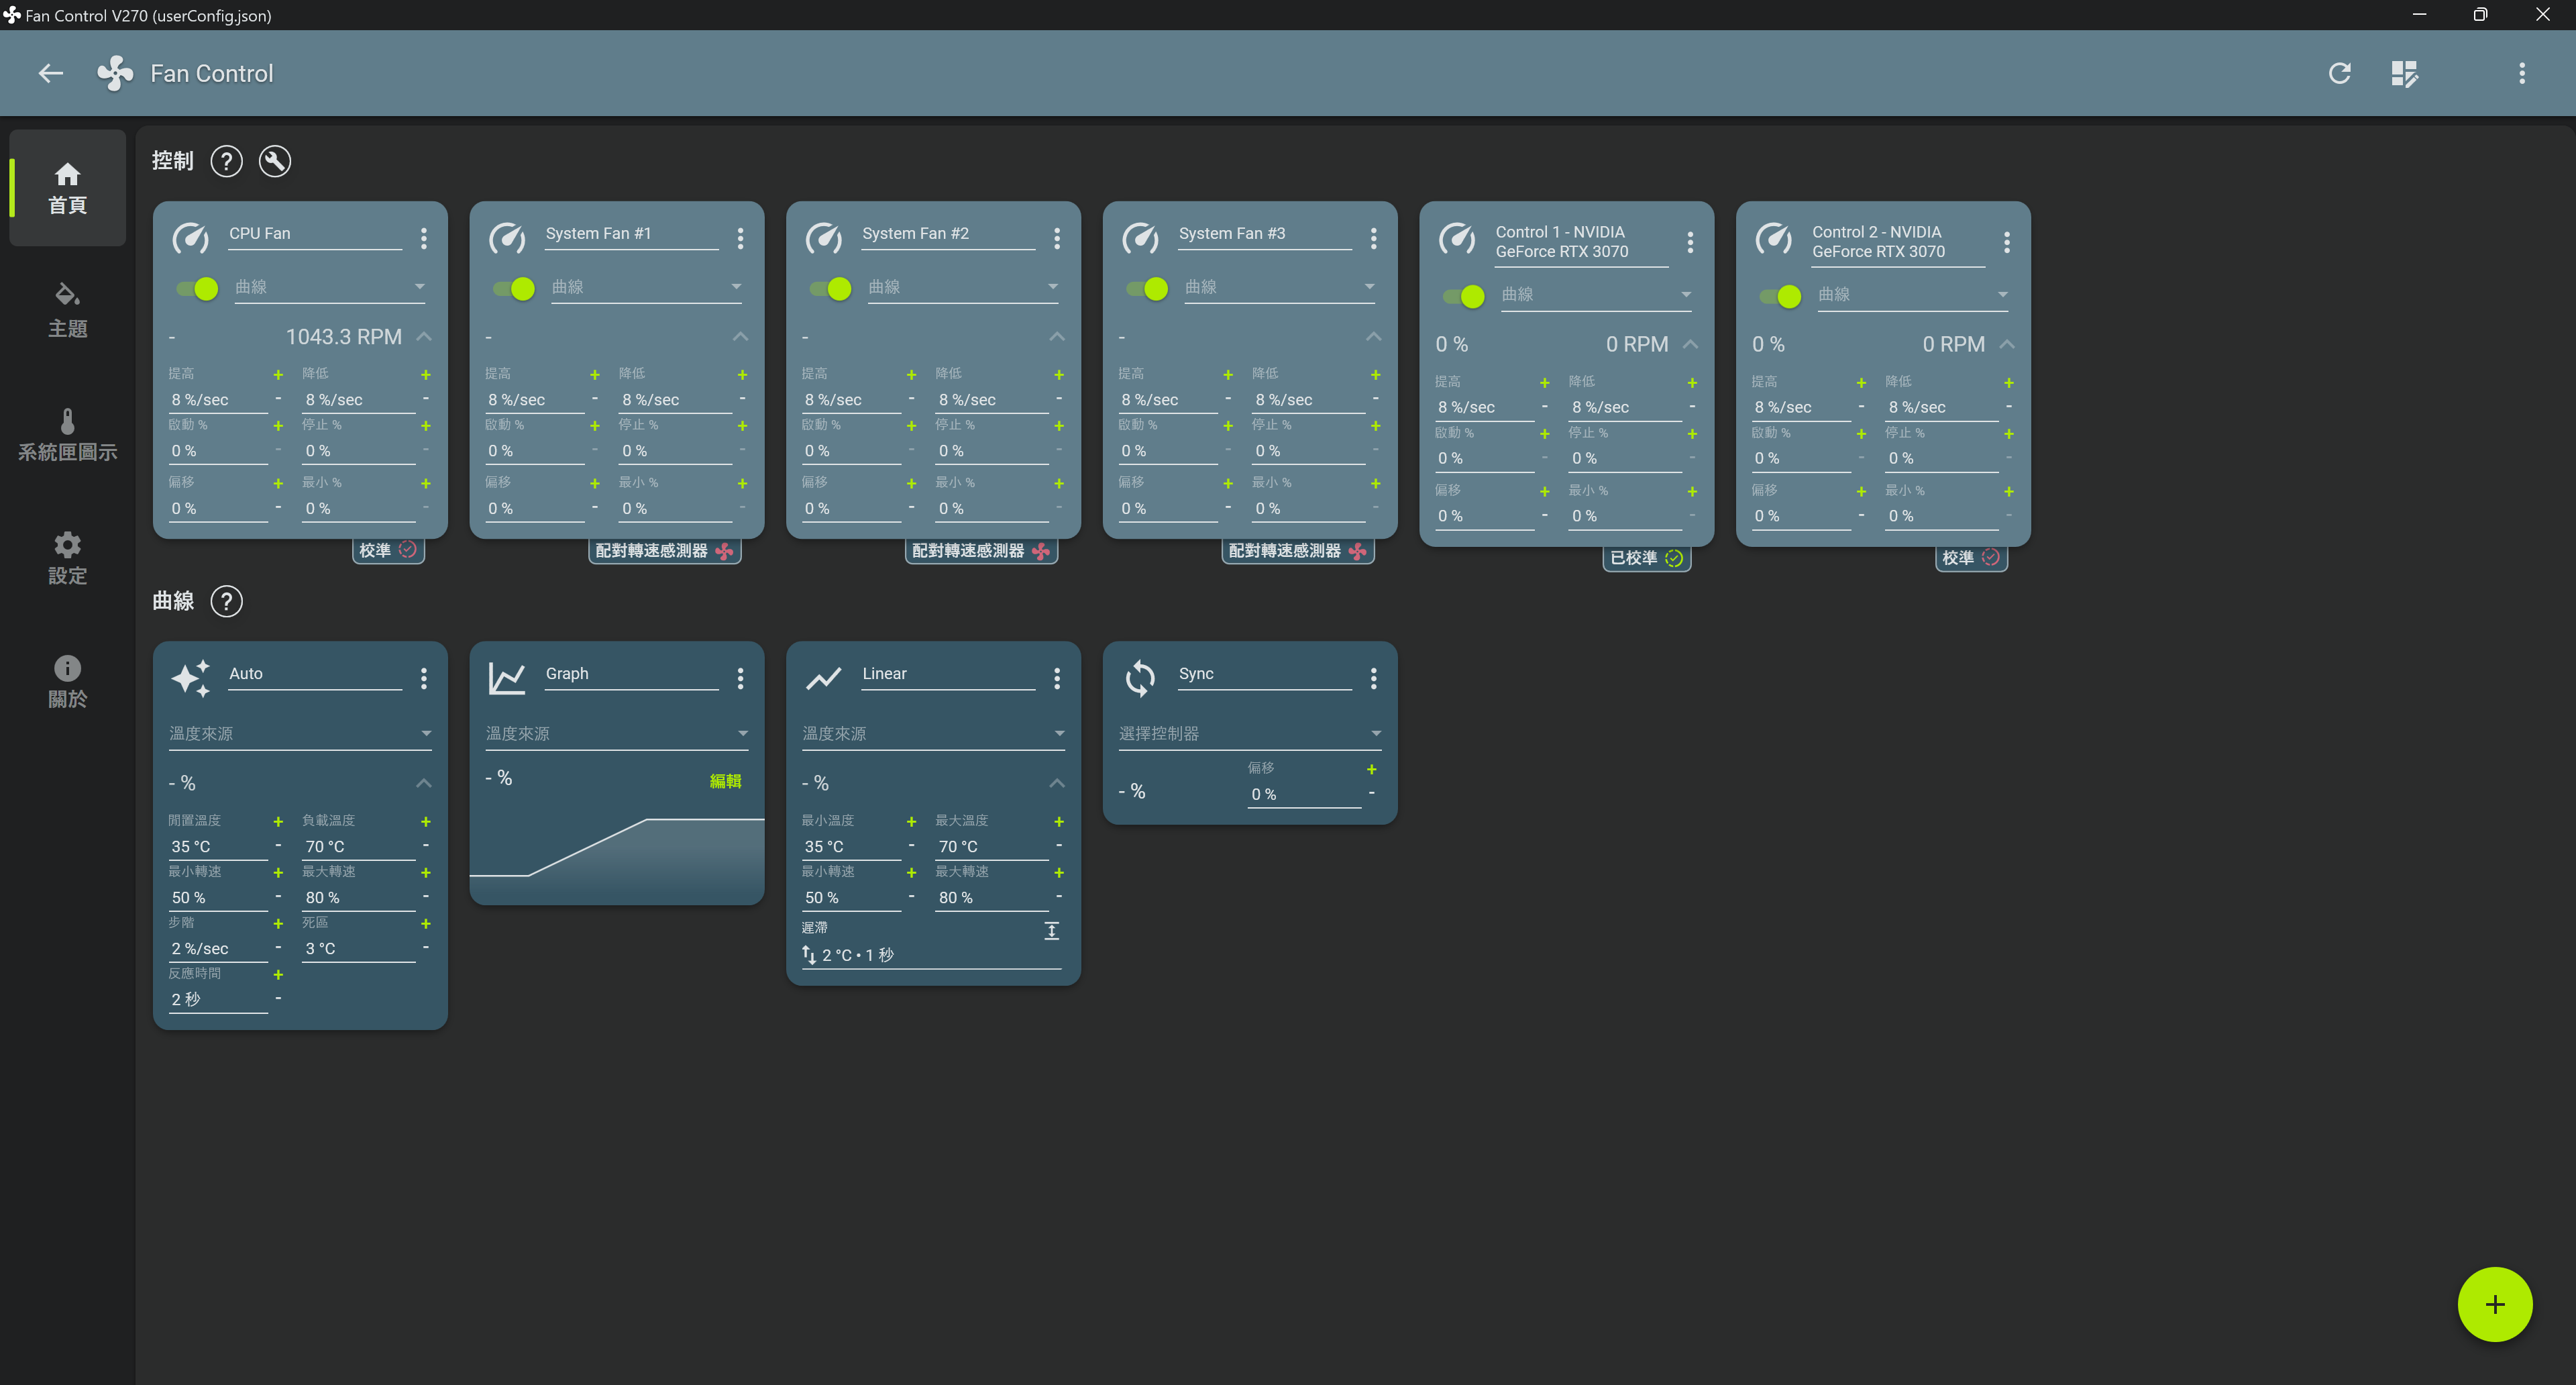
The lower-right corner lets you choose curves and controls to monitor
The official documentation lists quite a few curve types. The ones I think are most commonly useful are:
- Linear: Uses a temperature source and increases fan speed linearly between the minimum and maximum temperatures.
- Graph: Lets you draw the graph curve yourself, giving finer control over temperature and fan percentage.
- Mix Fan Curve: Mixes multiple curves and uses maximum, minimum, average, sum, or other methods to decide the output.
- Trigger: Switches to a higher speed after reaching the load temperature, then only drops back down after returning to the idle temperature. This is useful for avoiding frequent jumps.
- Flat: Fixed percentage, suitable for testing or synchronizing multiple fans.
- Sync: Makes other fans follow a certain control output.
- Auto: Attempts to find the lowest fan speed that can maintain the target load temperature.
I would start with Linear or Graph. I would not mix everything together right away. Once you understand how CPU, GPU, and case temperatures change on your own machine, using Mix Curve will be more stable.
Each curve can be defined in detail
The real strength of Fan Control is that each curve card can be finely tuned. You can choose the temperature source, set hysteresis and response time, and with Graph curves you can add and move points yourself to create a fan strategy that better fits your machine.
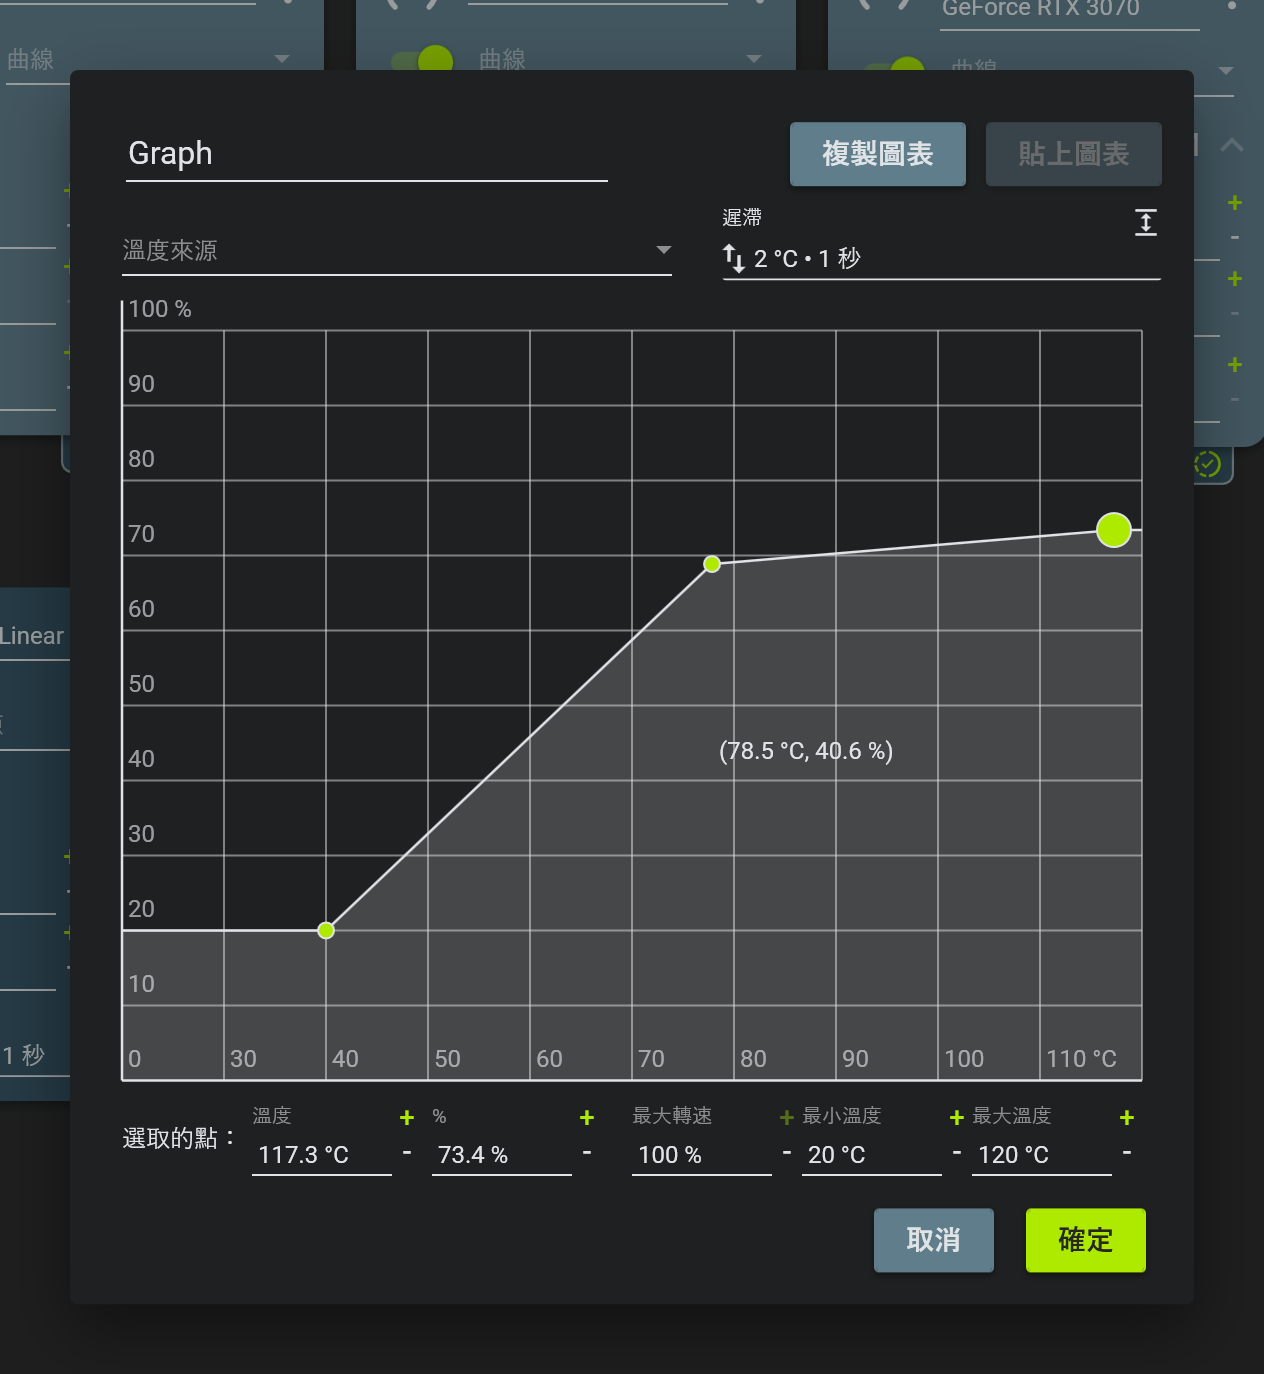
Curves can be customized, which is where Fan Control is more detailed than typical built-in tools
I would start conservatively:
- Do not rush to push the low-temperature range down to 0%. First confirm that the fan can really stop and start reliably.
- Use a smoother slope in the mid-temperature range to avoid daily use constantly getting louder and quieter.
- Keep enough speed in the high-temperature range. Do not suppress cooling just for quietness.
- For GPUs, remember that they may have 0 RPM conditions and minimum speed limits.
The official documentation also notes that modern NVIDIA GPUs have some limitations with third-party control, such as the common 30% minimum and 0 RPM conditions. AMD GPUs may also be affected by Adrenaline settings and Zero RPM conditions. This is not because Fan Control is doing a poor job; GPU vendor interfaces have their own rules.
Be prepared for hardware compatibility limits
Fan Control is very capable, but it cannot fully control every computer.
The official README puts this plainly: Fan Control is mainly a UI layer, and underneath it relies on existing hardware libraries, especially LibreHardwareMonitor. In other words, if the lower layer cannot detect your fan controls or sensors, Fan Control itself may not be able to make them appear.
Desktop PCs usually have a better chance of working, especially with motherboard fans, GPU fans, and common liquid coolers or controllers. Laptops are more complicated. The official FAQ also mentions that most laptop fans are not designed to be controlled through third-party software interfaces. Even if the app installs, it may not find fans or may throw errors. Some laptops may be supported through plugins, but there is no guarantee.
So if you open it and do not see control cards, that does not mean you did something wrong. It may be that the motherboard, laptop EC, controller, or driver layer is not supported. In that case, instead of installing a bunch of tools at random, I would first check GitHub issues, the official documentation, and whether there is a plugin suitable for your hardware.
How I would use it
If I were using Fan Control long term on a Windows desktop, I would do this:
First, observe only and do not rush to change anything. Look at which sensors it detects, and confirm whether CPU, GPU, motherboard, and SSD temperatures look reasonable.
Second, calibrate the fans. At least make sure the main case fans and CPU / AIO-related fans have clear start, stop, and RPM mapping.
Third, create simple curves. Let CPU-related fans follow CPU temperature first. For case intake and exhaust, consider using the maximum of CPU and GPU. For GPU fans, first respect the graphics card’s own limits.
Fourth, test with real workloads. Do not only look at the idle desktop. Open a game, run a video export, compile something, run a stress test, or do the things you actually do normally, then observe whether temperatures and noise stay stable.
Fifth, fine-tune. If it feels too loud, adjust the mid-temperature slope and response time. If it feels too hot, increase the high-temperature fan speed. Change only one or two things at a time, so you know what caused the difference.
Conclusion
Fan Control is one of the most detailed and engineering-minded fan control tools I have seen on Windows so far. It does not simply give you a few preset modes. Instead, it separates control, speed, temperature, curves, calibration, and plugins, letting you assemble a cooling strategy that fits this specific machine.
But because it gives you so much freedom, I would not recommend randomly dragging curves the first time you open it. Switch to Traditional Chinese, understand the cards, calibrate the fans, and start with simple curves. That is much safer than immediately chasing “so quiet you cannot hear it.”
For me, the best user for Fan Control is someone with a Windows desktop who feels motherboard software is too crude, BIOS curves are not detailed enough, and is willing to spend a bit of time understanding their own fans and temperatures. As long as the hardware is compatible, it can control a lot of details.