HandBrake Hands-on: This Long-running Open-source Video Compression Tool Is Still Very Steady
HandBrake is a long-running open-source video transcoding and compression tool. I did a quick test this time with a 4K video: the original 106.1 MB file was compressed to 16.6 MB, and the image quality held up better than I expected. This post records my basic workflow and notes on choosing presets.
Introduction
Today I tested HandBrake. This tool probably does not need much introduction. Anyone who has worked with video transcoding or compression has likely heard of it. It has been around for a long time, and the interface does not follow the flashy modern video editor route, but after opening it again this time, I actually felt it is still very worth keeping in the toolbox.
I used a 4K video of about 33 seconds for a quick test. The original file size was 106.1 MB. This time I directly applied the Very Fast 2160p60 4K HEVC preset, and the final output was about 16.6 MB. This is not a strict benchmark, just my own everyday video compression scenario, but the result was pretty clear: the file became much smaller, and the image quality was still well preserved.
What It Is Good For
I would put HandBrake in the position of “the video is already finished, but the file is too large.”
Scenarios where it fits well:
- Screen recordings are too large, and you want to shrink them before uploading or backing them up.
- Videos exported from phones, cameras, or editing software are too bulky.
- You want to convert a video into a more common MP4 format.
- You want to batch process multiple videos.
- You want to preserve quality without looking up a bunch of FFmpeg parameters yourself.
Scenarios where it is less suitable:
- You need to edit video, add subtitles, color grade, or create transitions.
- You need detailed audio track engineering.
- You need a fully automated, large-scale server transcoding workflow.
It is not editing software, and it is not an asset management tool. The most comfortable way to use it is: choose a video, choose a preset, choose an output location, and start compression. That is plain, but also reliable.
Download and Installation
HandBrake supports Windows, macOS, and Linux. The official documentation specifically reminds users to download it from the HandBrake website, which is also the easiest way to avoid strange repackaged versions or third-party installers.
The version currently shown on the official download page is 1.11.2. Download the matching version for your operating system. macOS has a Universal version, and Windows has both installer and zip versions available.
After installation, opening it shows a very traditional desktop tool interface. At first glance, it may feel like there are many buttons, but if you only want to compress a video, you actually only need a few areas.
Step 1: Open the Video Source
After entering HandBrake, first click Open Source in the upper-left corner and choose the video you want to compress or transcode.
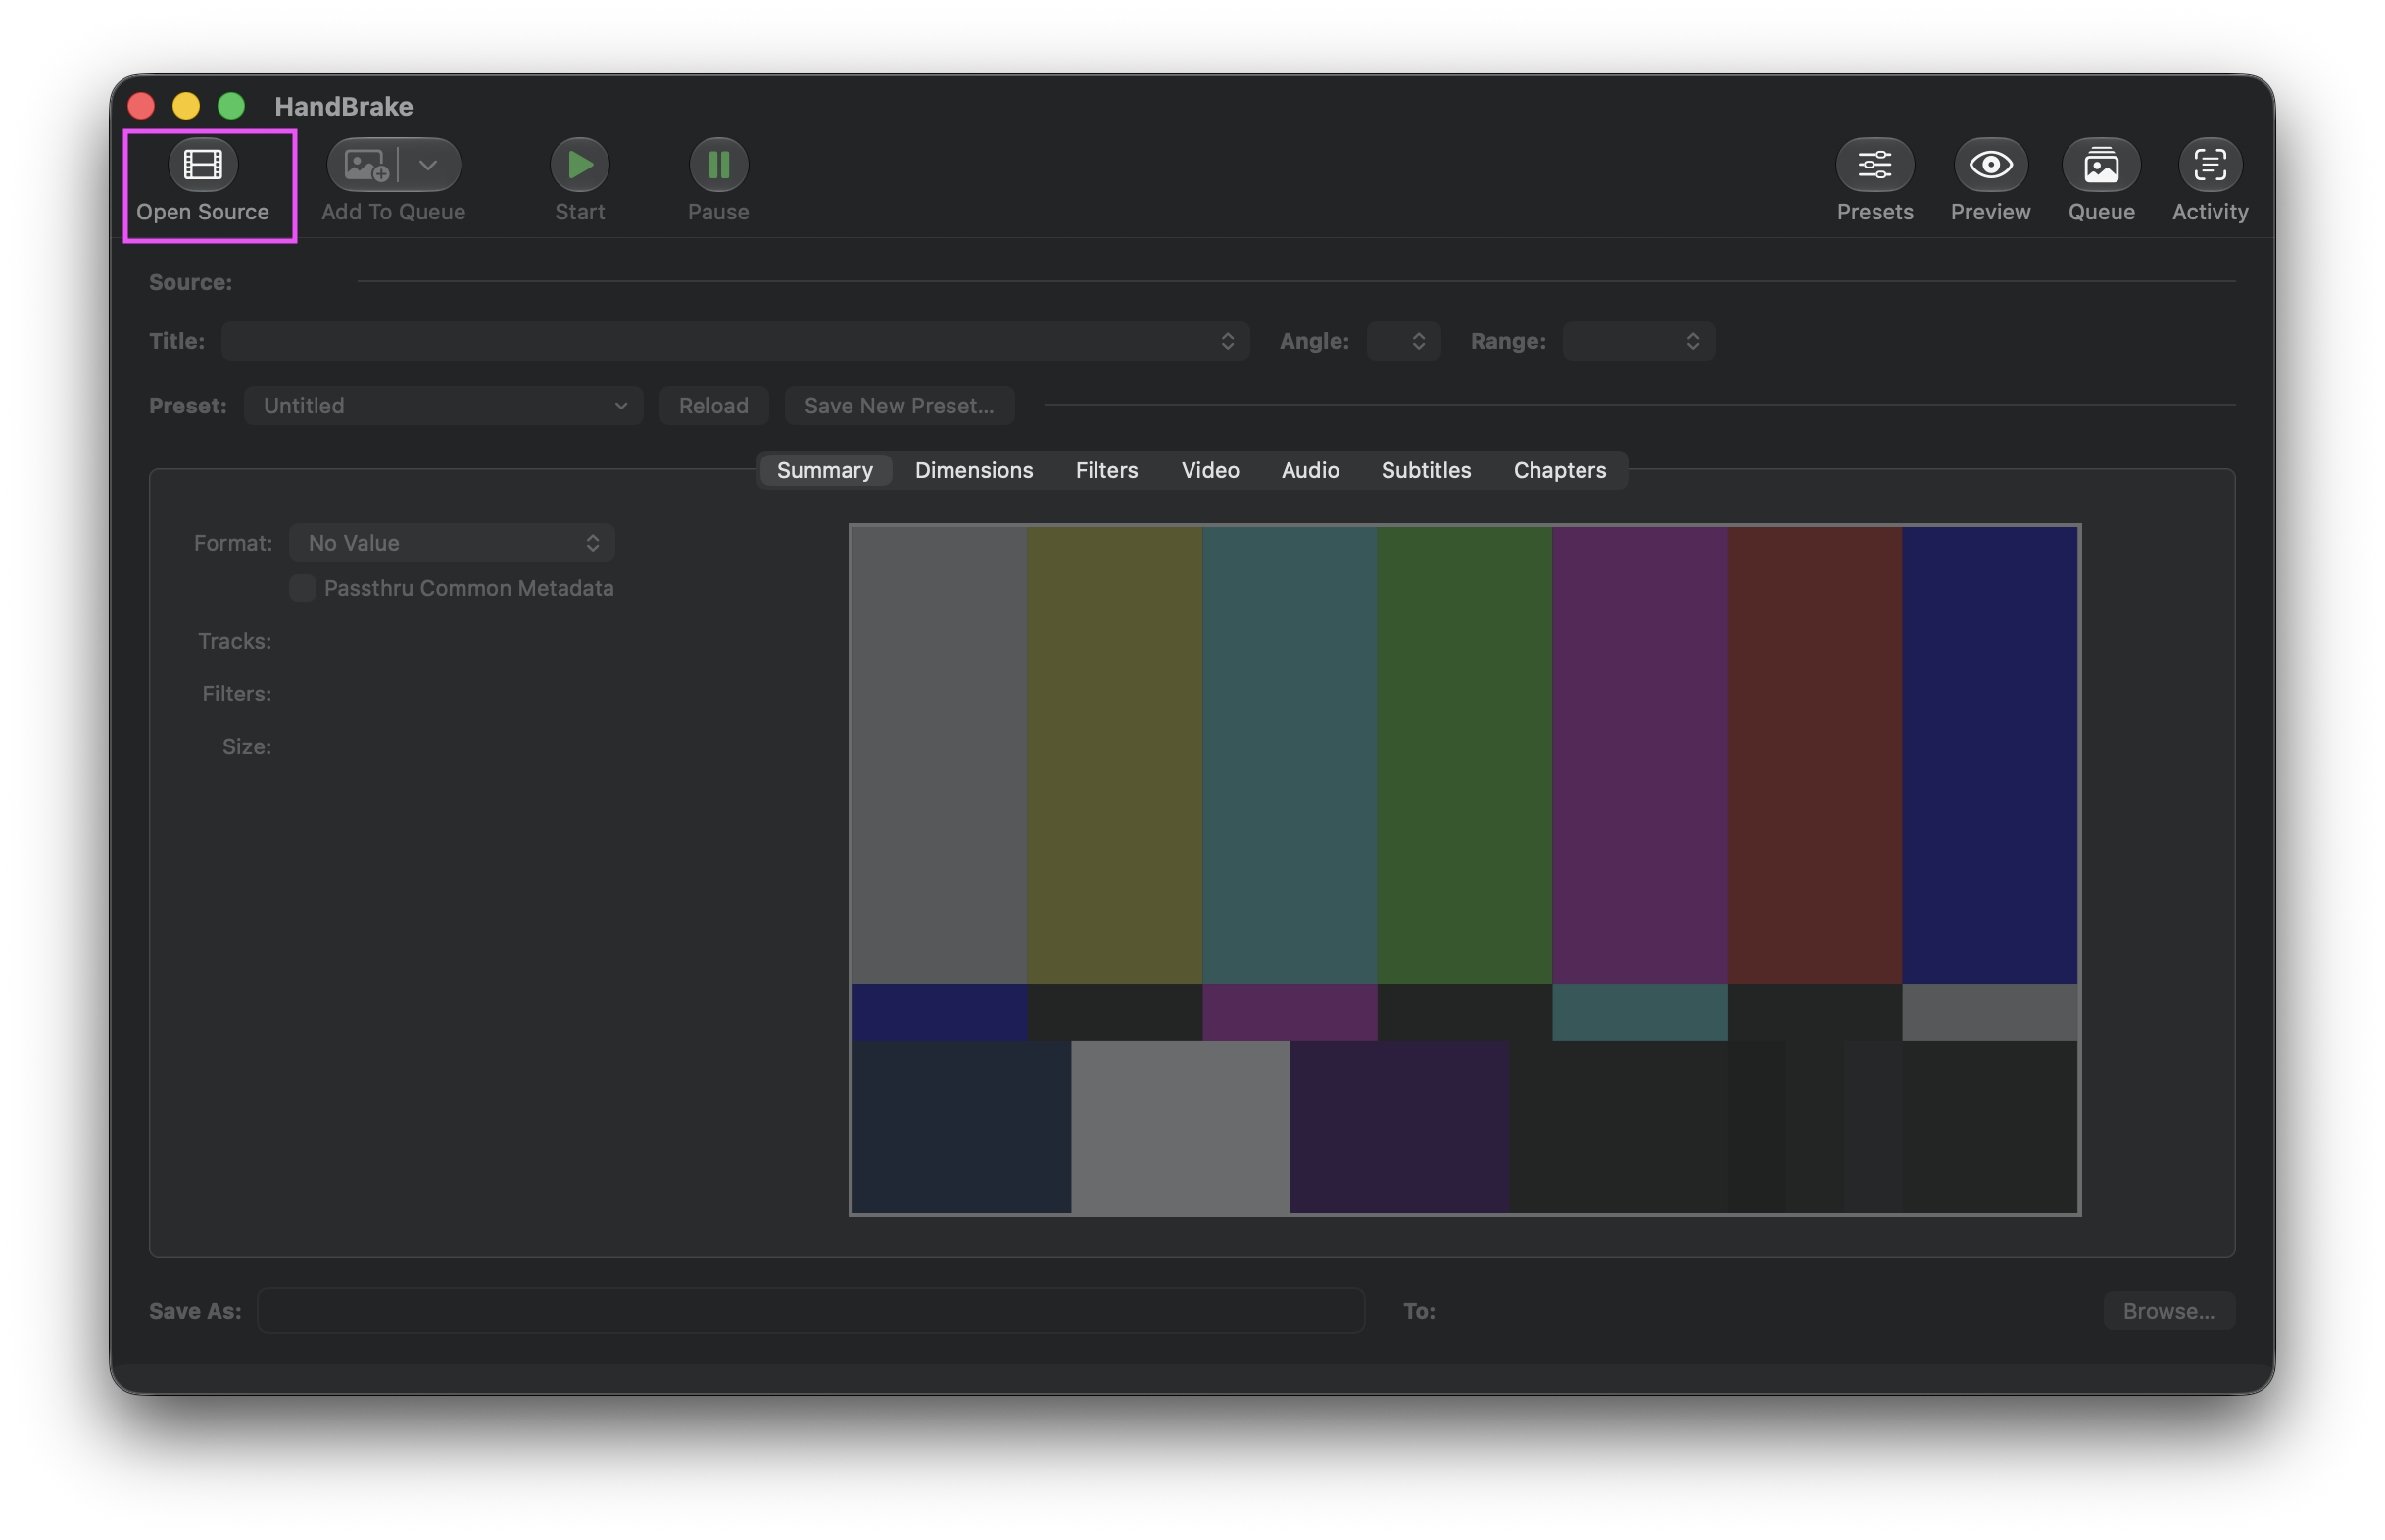
Open Source in the upper-left corner is the starting point of the whole flow. First, bring in the video you want to process.
After the video is loaded, HandBrake analyzes information such as resolution, frame rate, audio tracks, subtitles, and chapters. For normal video compression, you do not need to understand every tab. First, just confirm that the source file has loaded correctly.
I usually check three things first:
- Whether the resolution is correct.
- Whether the frame rate matches the original video setting.
- Whether the audio was detected.
If it is just a screen recording or social media video, HandBrake can usually process it directly after import.
Step 2: Choose a Preset
The most convenient part of HandBrake is its presets. You do not need to study x264, x265, RF values, bitrate, or encoder tune from the start. Begin with the official presets, and you can usually get a decent result.
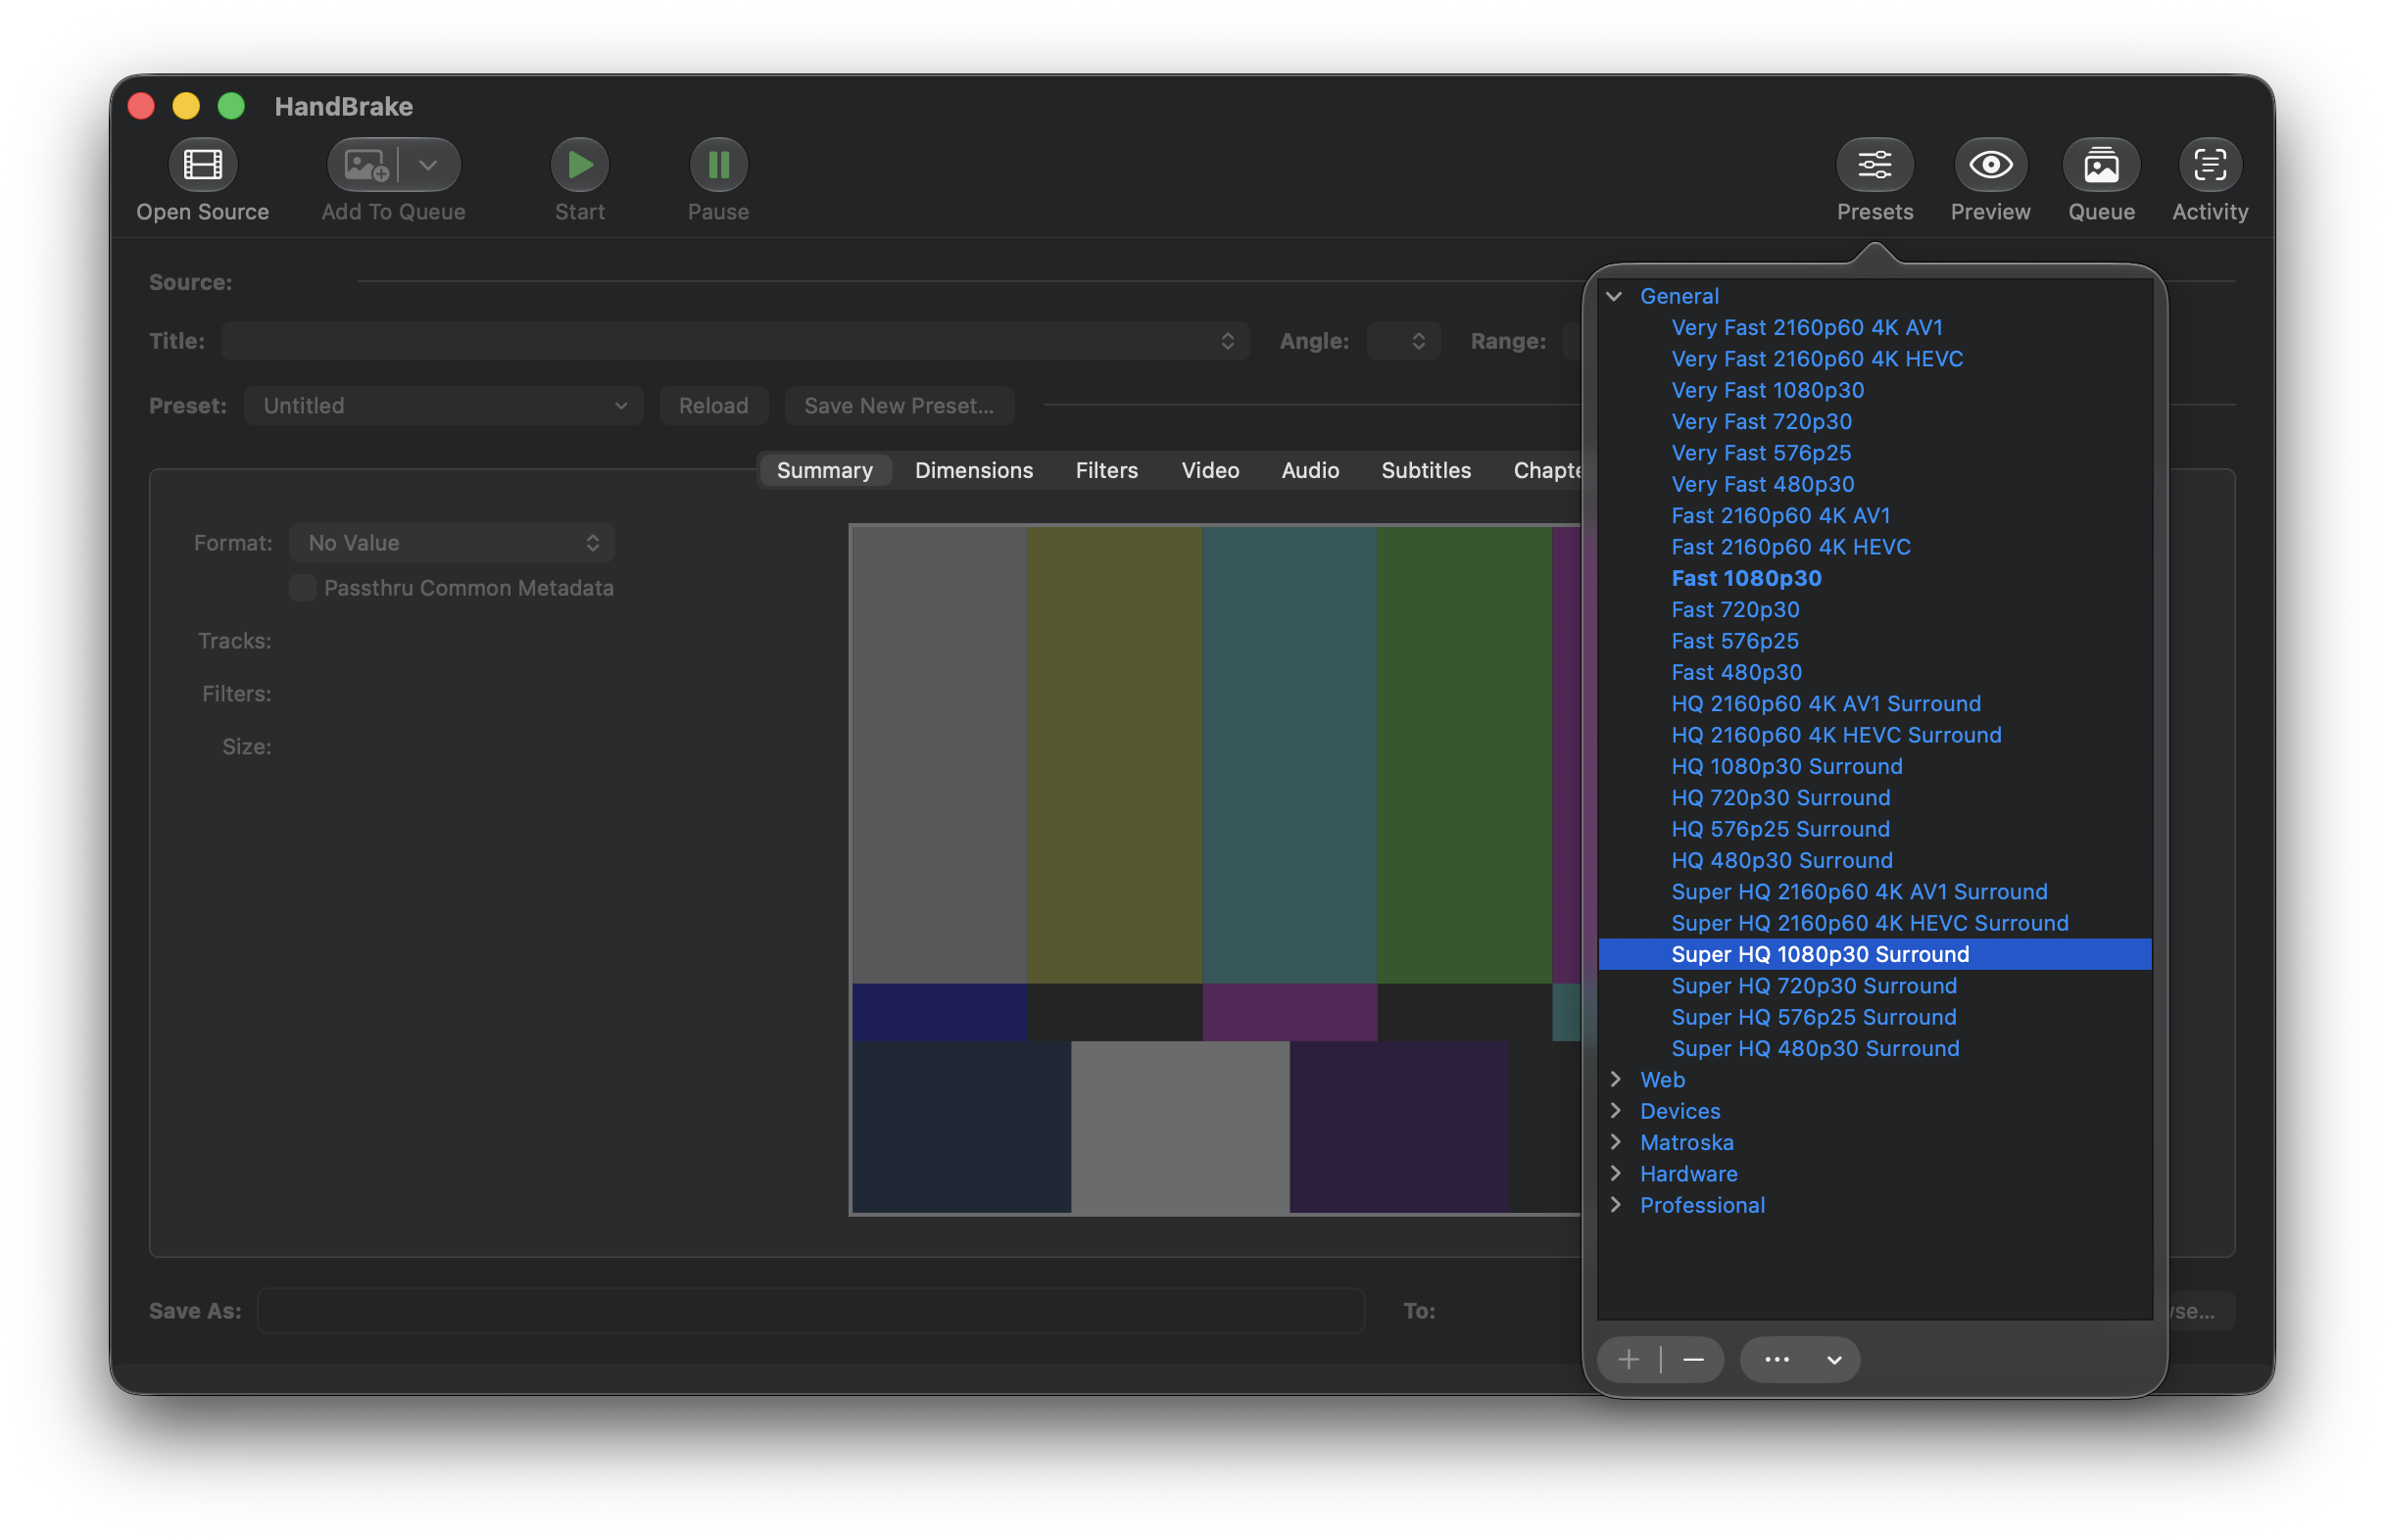
Presets are organized by speed, resolution, frame rate, and encoding format. Start by choosing one that is close to your needs.
This time I used Very Fast 2160p60 4K HEVC. The name shown in the video demo basically already explains the direction:
Very Fast: favors speed, with a shorter compression time.2160p60 4K: the highest target is 4K 60 FPS.HEVC: uses H.265, which usually saves more space than H.264, but compatibility with older devices may be slightly worse.
If you just want to send the video to most devices for playback, H.264 presets like Fast 1080p30 or HQ 1080p30 are more conservative.
If you want a smaller file and the playback devices support HEVC, then an HEVC preset is a good fit.
If you want to try higher compression efficiency, you can also look at AV1 presets, but AV1 encoding time and playback compatibility need to be considered separately.
My own habit is like this:
- Sending to someone else, and unsure about their device: prioritize H.264 / MP4.
- Backing up for myself, and my devices are all newer: try HEVC.
- Wanting to make the file even smaller, and not in a hurry to export: then consider AV1.
Step 3: Choose the Output Location
After choosing a preset, next look at Save As near the bottom and Browse in the lower-right corner. This is where you can specify the output filename and folder.
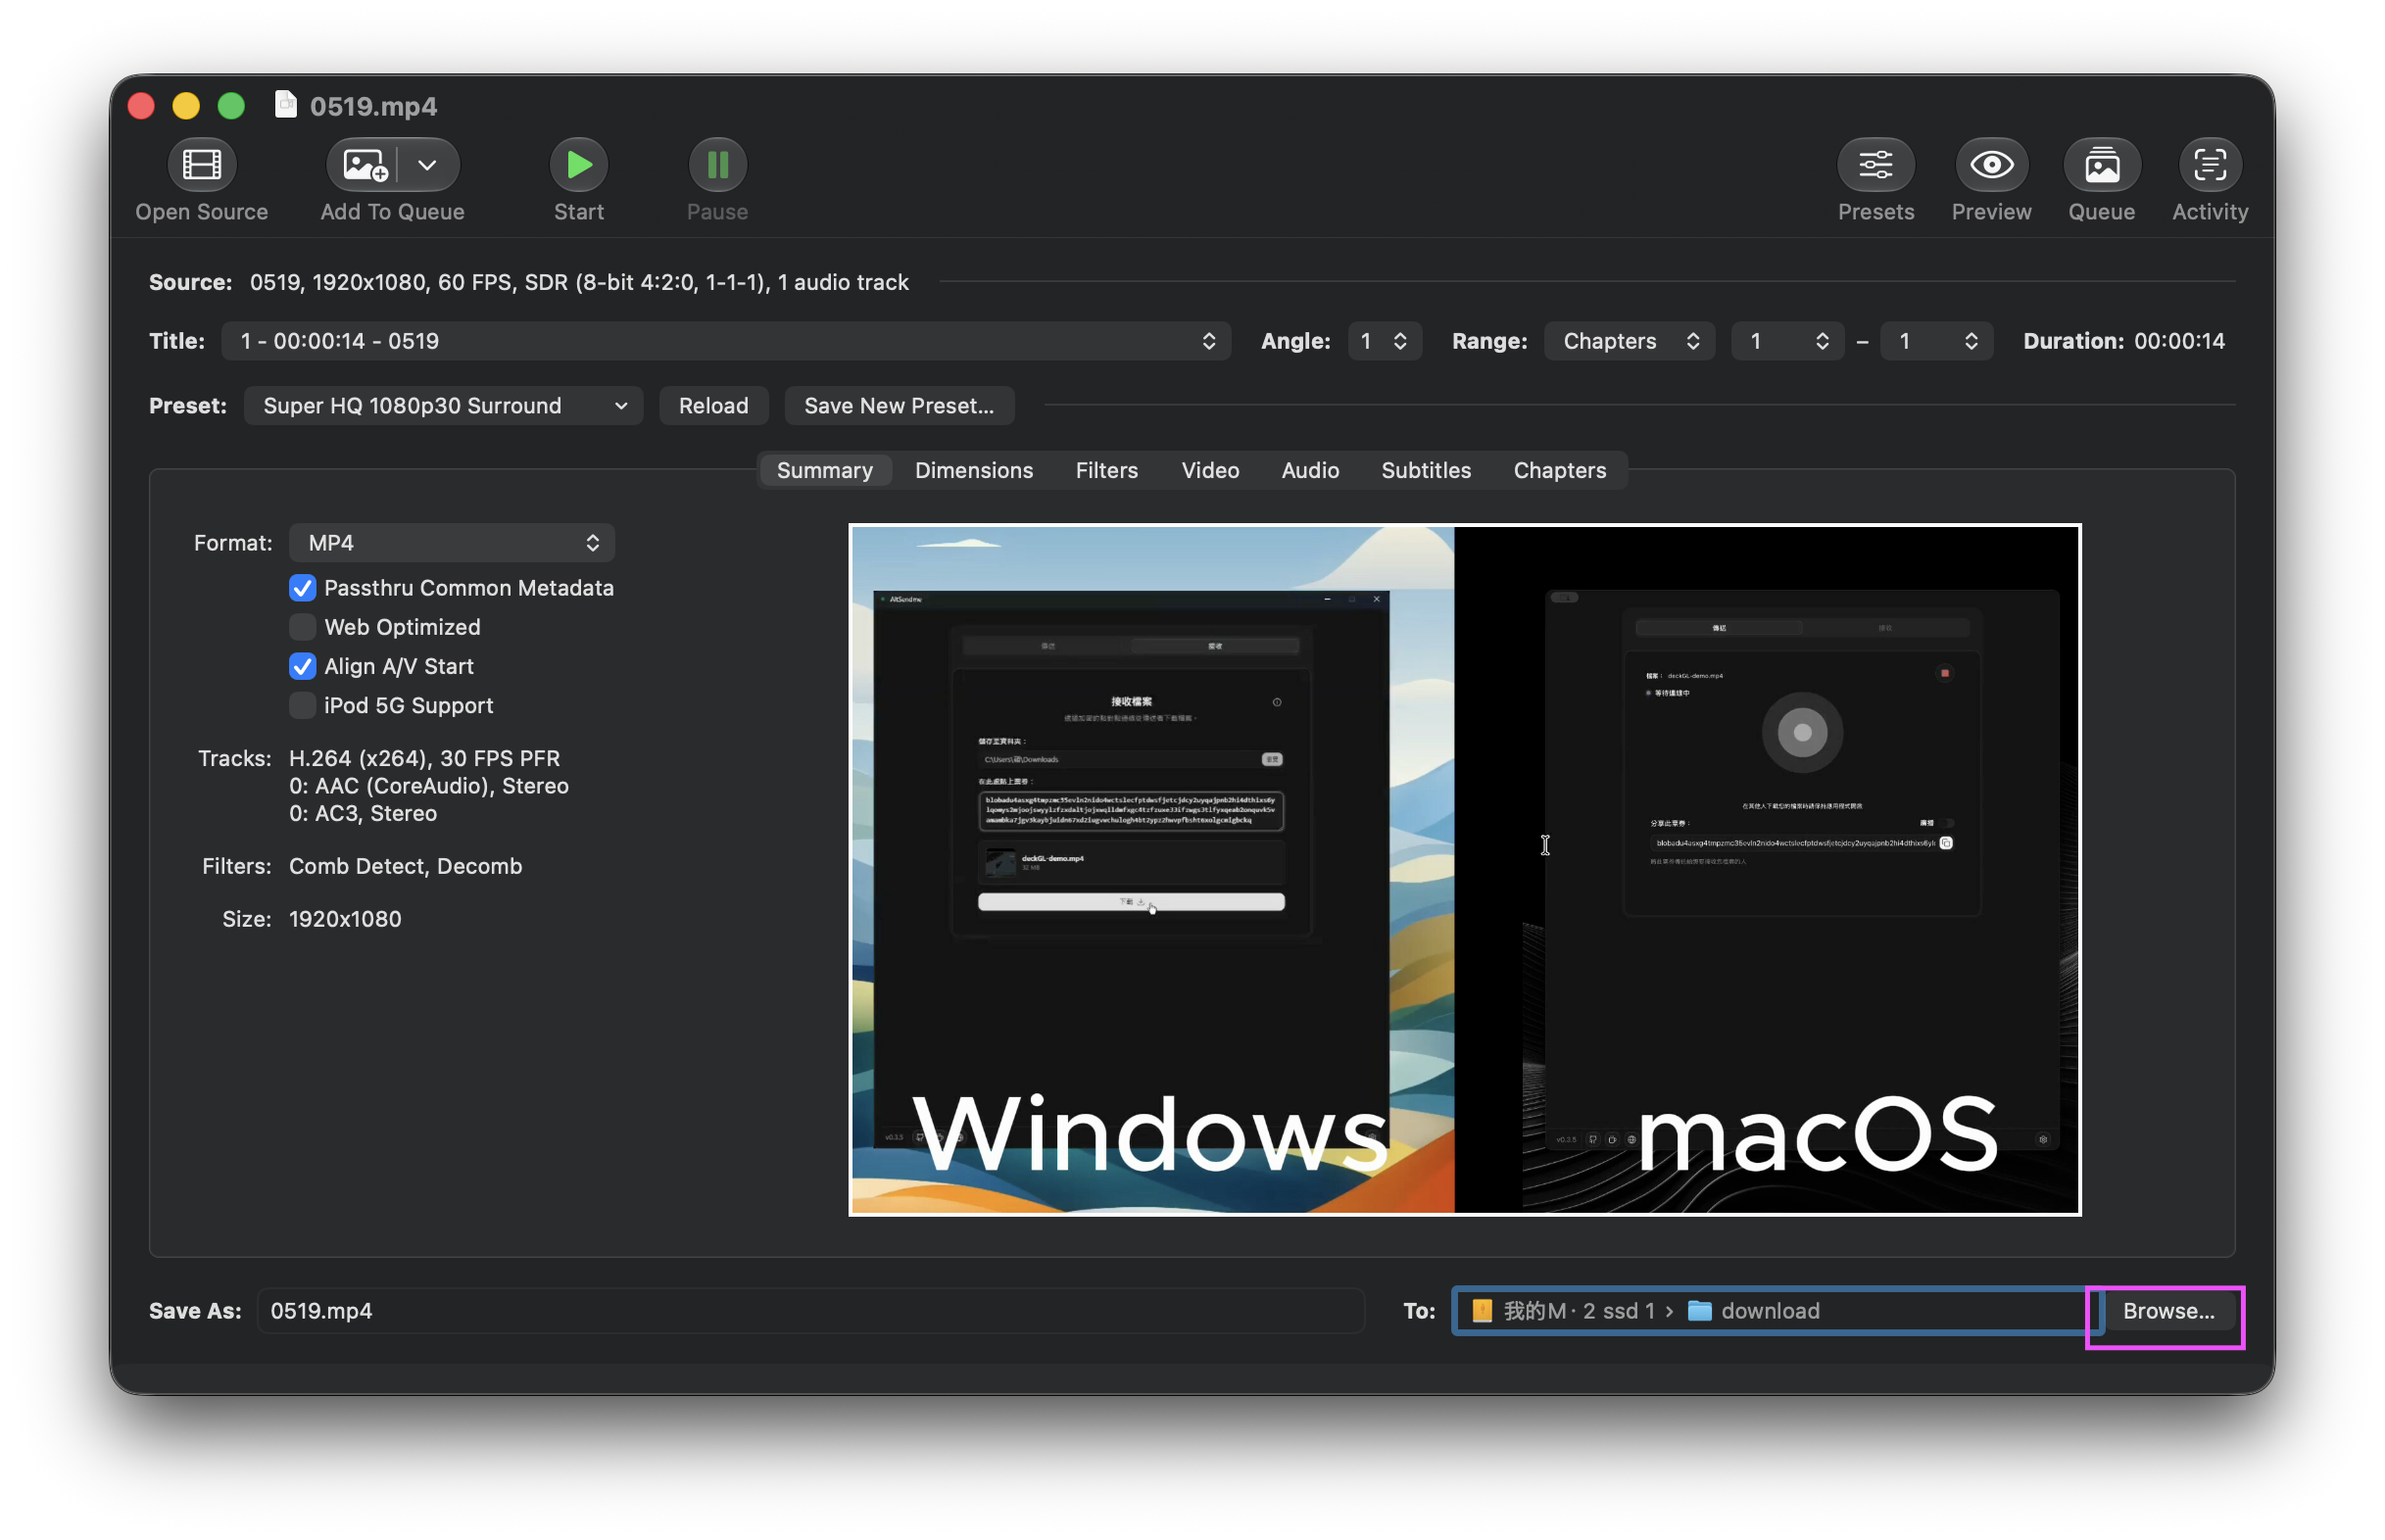
After setting the output location, click Start at the top to begin transcoding.
For this step, I recommend building one habit: do not overwrite the original file directly. Export to another filename first, confirm that both image quality and audio are normal, and then decide whether to delete the original file.
This is especially useful when you are testing different presets. It is best to mark the settings in the filename. For example:
demo-original.mp4
demo-hevc-fast.mp4
demo-h264-1080p.mp4
This makes it easier to compare later, so you do not forget which file used which setting after testing a few versions.
Results from This Test
My simplest test this time was to use an official preset directly, without fine-tuning parameters.
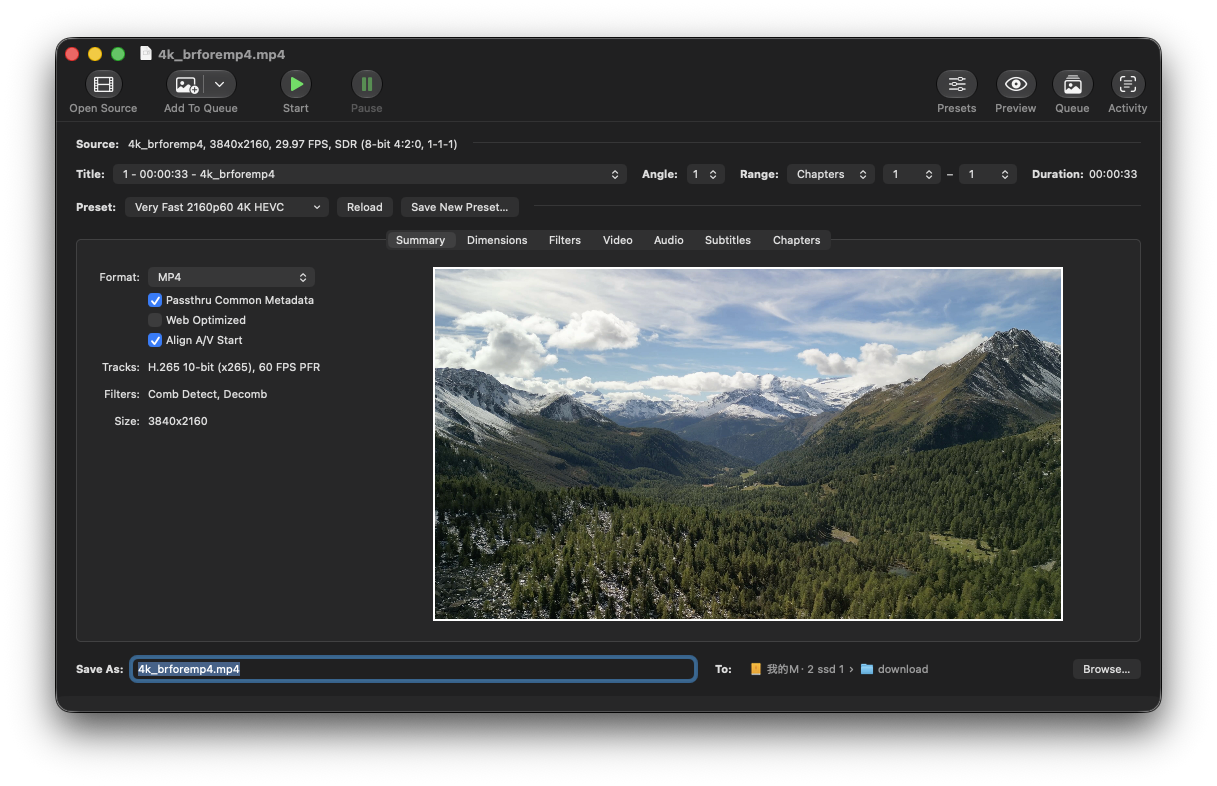
Test settings screen
- Source: 4K video, about 33 seconds.
- Original size: 106.1 MB.
- Preset used:
Very Fast 2160p60 4K HEVC. - Output size: about 16.6 MB.
The compression ratio was quite noticeable, and the most important thing was that the image quality did not become obviously blurry. Of course, this also depends on the video content. If the scene changes very quickly, has a lot of noise, or contains many fine details, the compressed result will depend more heavily on the settings. But for the screen-recording-style material I tested this time, this preset was already good enough.
I also like the stability of HandBrake. It does not really give me that feeling of “every time I open it, the UI has changed again.” The operation logic is very consistent. For a tool, that is actually a strength, especially when you just want to quickly make a video smaller and do not want to learn a new workflow.
How to Choose Presets Without Running Into Trouble
If this is your first time using it, I recommend not rushing into manually adjusting a bunch of parameters. HandBrake’s official presets already divide things into several clear directions.
Speed
Very Fast and Fast output faster, making them suitable for everyday compression, testing, and screen recordings.HQ and Super HQ usually take longer, but the quality settings are more conservative.
I usually start with Fast or Very Fast. I only move toward HQ if I am really not satisfied with the image quality.
Resolution
If the original video is 4K, but you only need it for a website, social media, or a presentation, 1080p is often enough.
If you want to keep 4K material, then choose a 2160p-related preset.
This matters a lot because resolution has a major impact on file size. Not every video needs to forcefully remain 4K.
Encoding Format
H.264 is the most widely compatible, and older devices, browsers, and players are less likely to run into issues.
HEVC files can usually be smaller, but you need to pay attention to support on older devices.
AV1 has good compression efficiency, but encoding time and compatibility depend on your hardware and playback environment.
For now, I still use H.264 and HEVC most often. I leave AV1 for situations where I am less rushed, or where I clearly know the playback side supports it.
Notes After Using It
HandBrake is not a new tool, and it is not the kind of software that feels trendy as soon as you open it. But after actually testing it, I ended up feeling that this is exactly where its strength is. It is direct, stable, and focused on “turning a video into the format you want.”
What I like most is its preset system. A lot of the time, the annoying part of video compression is not that the tool is not capable enough, but that there are too many parameters, and first-time users do not know where to start. HandBrake at least gives you a clear starting line: choose a preset close to what you need, run it once, check the result, and then fine-tune.
If you often run into videos being too large, uploads being slow, or backups taking too much space, HandBrake is still very useful today. Especially for materials like screen recordings, tutorial videos, and demo videos, running them through it once can usually save a lot of space.
Related Links: