

MOLE Hands-on: Let an AI Agent Analyze First, Then Clear 15GB from Your Mac
MOLE is an open-source macOS maintenance tool for the terminal. I used mo analyze, mo status, and mo clean --dry-run to inspect disk usage and caches, then cleared 15.29GB. It also gives AI agents a safe way to analyze first, with a human approving cleanup.
Introduction
When my Mac storage starts filling up, I can usually guess that caches, development tools, or browsers are involved. What is harder is knowing where to start. Digging through ~/Library manually takes time, while a cleanup app can make changes without making its target list obvious.
This time I tried MOLE, an open-source macOS terminal tool that puts cleanup, disk analysis, app uninstallation, and system monitoring into one command-line interface. I did not start by cleaning anything. I scanned and previewed the list first, then ran the cleanup after checking it. This Mac ended up reclaiming 15.29GB.
I found it more interesting in the age of AI agents. MOLE does not only print a human-readable terminal view: both mo analyze and mo status can produce JSON. As long as an agent has permission to use the local terminal, it can summarize the largest storage areas and flag unusual caches before I decide whether cleanup should happen.
The video shows me running mo analyze, mo status, and mo clean --dry-run in sequence. The actual cleanup takes a little longer, so the finished result appears later in this article.
AI agents are best for analysis, not for pressing Clean
Managing storage used to mean switching between Finder, System Settings, and Terminal. Now I can hand the investigation to a local-shell agent such as Codex or Claude Code: ask it to run mo analyze --json, then turn the biggest directories, old downloads, and caches into a readable recommendation. That is more reliable than asking an agent to guess what can be removed from ~/Library.
I would give an agent constraints like these:
Use mo analyze --json and mo clean --dry-run to inspect reclaimable space on this Mac.
List the largest categories, likely impact, and items that should be retained.
Do not run mo clean; wait for my confirmation before any cleanup.
The division of work is useful: an agent is good at reading lists, comparing sizes, and summarizing the result; a person should decide what actually gets removed. MOLE's --dry-run, allowlist, and operation history keep that workflow from becoming “ask AI for help, then lose data.”
I started with mo analyze to see what was using the disk
The first command I would open is:
mo analyze
It divides disk use into areas such as Home, User Library, Applications, System Library, and old downloads, then lets me drill in. That is more useful than immediately clearing caches, because I can first tell whether the issue is an application, my user library, or the Downloads folder.
MOLE's analyzer supports the arrow keys and Vim-style h, j, k, and l navigation. If I choose files to clean from the analysis screen, it moves them to Trash rather than deleting them outright. I can also point it at a path such as mo analyze /Volumes when I need to inspect external drives.
The second step is a preview, not a cleanup
The preview mode is the reason I wanted to keep using it:
mo clean --dry-run
This scan listed 24.91GB of potential cleanup, including user caches, browser caches, npm caches, Xcode Simulator caches, and logs. It also writes the full list to ~/.config/mole/clean-list.txt, so I can read it before doing anything. If there is a path I want to keep, I can add it to the allowlist with mo clean --whitelist.
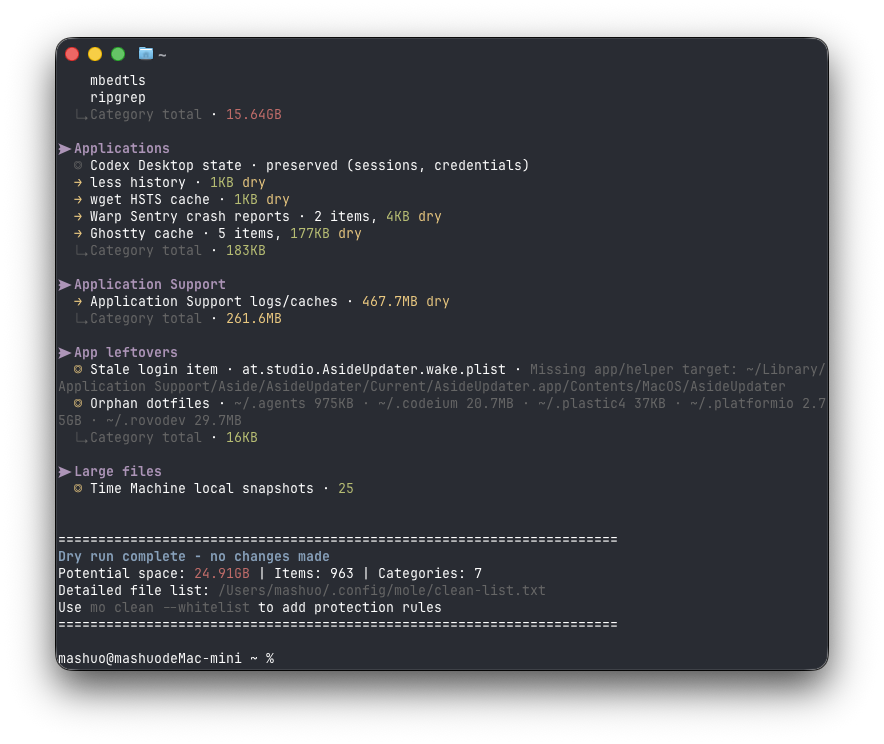
Preview mode scans only; the screen explicitly says that no files are deleted.
There is one habit worth keeping here: do not run mo clean just because the number is large. For example, my scan found Time Machine local snapshots. MOLE only suggested checking them separately with tmutil listlocalsnapshots /; it did not treat them as ordinary caches to remove. For active apps, browser data I want to retain, or folders with an unclear purpose, I check the list first.
The cleanup result on this Mac
After checking the preview, I ran:
mo clean
The process requests administrator permission because some system caches and diagnostic logs need elevated access. My run cleared 1,557 items across 45 categories, totaling 15.29GB. That included npm caches, development-tool caches, old browser caches, and logs. The relevant tools will recreate or download those caches when they need them again.
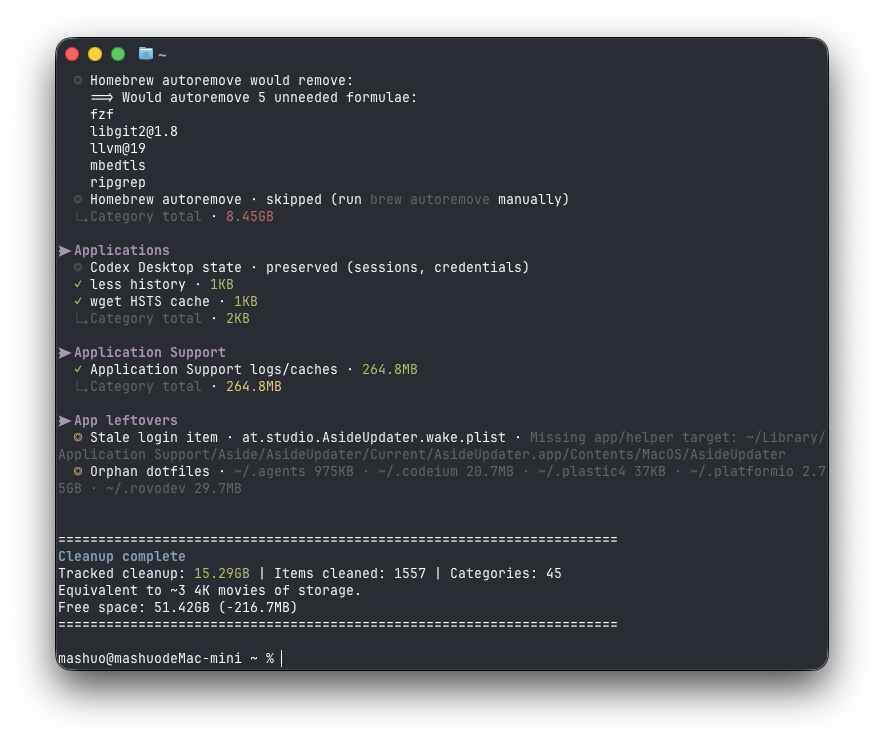
The actual cleanup cleared 15.29GB; the preview and final totals do not have to match.
The 24.91GB preview and 15.29GB final result should not be treated as a before-and-after accounting comparison. The two scans can happen at different times, with different active apps and items that are protected or skipped. For me, the preview is for reviewing scope; the completion screen is what shows what was actually removed in that run.
mo status is useful for a quick system check
mo status
In addition to cleanup, MOLE has a live dashboard for CPU, memory, disk, network, and the processes using the most resources. I would not keep it open to replace a dedicated system monitor, but when my Mac suddenly feels slow, one quick check can reveal whether memory is tight, storage is nearly full, or a process is busy.
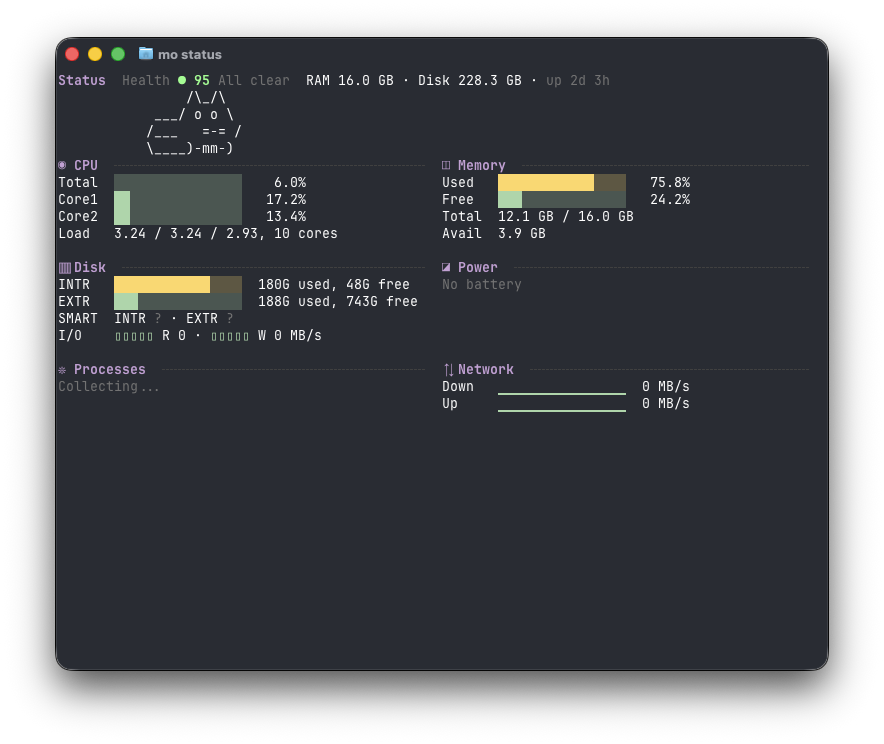
The status screen puts the common system measurements into one terminal view.
Installation and the agent-assisted order I recommend
You can download MOLE from its Releases page, or install it with Homebrew on macOS 14 or later:
brew install mole
After installing it, this is the order I recommend for an agent or for myself:
mo analyze
mo clean --dry-run
mo clean
The first command finds the broad source of the problem, the second lets me review the cleanup list, and the last one makes the actual changes. When I want agent assistance, I give it the output of the first two steps to summarize; I still reserve the last line for my own approval. Add mo status whenever I want a current performance check. MOLE also includes mo uninstall, mo purge, and mo installer, but I think it is enough to get comfortable with these three steps first.
I will keep it on my Mac for the next time disk space disappears or development tools leave behind too much cache. MOLE does not decide whether every file is safe to remove, but it makes the scan-first, clean-later workflow very clear.